lamp分离部署+phpmyadmin_phpmyadmin lamp windows-程序员宅基地
1. lamp简介
有了前面学习的知识的铺垫,今天可以来学习下第一个常用的web架构了。
所谓lamp,其实就是由Linux+Apache+Mysql/MariaDB+Php/Perl/Python的一组动态网站或者服务器的开源软件,除Linux外其它各部件本身都是各自独立的程序,但是因为经常被放在一起使用,拥有了越来越高的兼容度,共同组成了一个强大的Web应用程序平台。
LAMP指的是Linux(操作系统)、Apache(HTTP服务器)、MySQL(也指MariaDB,数据库软件)和PHP(有时也是指Perl或Python)的第一个字母,一般用来建立web应用平台。
2. web服务器工作流程
在说lamp架构平台的搭建前,我们先来了解下什么是CGI,什么是FastCGI,什么是…
web服务器的资源分为两种,静态资源和动态资源
静态资源就是指静态内容,客户端从服务器获得的资源的表现形式与原文件相同。可以简单的理解为就是直接存储于文件系统中的资源
动态资源则通常是程序文件,需要在服务器执行之后,将执行的结果返回给客户端
2.1 cgi与fastcgi
上图阶段①中提到了FastCGI,下面我们来了解下CGI与FastCGI。
CGI(Common Gateway Interface,通用网关接口),CGI是外部应用程序(CGI程序)与WEB服务器之间的接口标准,是在CGI程序和Web服务器之间传递信息的过程。CGI规范允许Web服务器执行外部程序,并将它们的输出发送给Web浏览器,CGI将web的一组简单的静态超媒体文档变成一个完整的新的交互式媒体。
FastCGI(Fast Common Gateway Interface)是CGI的改良版,CGI是通过启用一个解释器进程来处理每个请求,耗时且耗资源,而FastCGI则是通过master-worker形式来处理每个请求,即启动一个master主进程,然后根据配置启动几个worker进程,当请求进来时,master会从worker进程中选择一个去处理请求,这样就避免了重复的生成和杀死进程带来的频繁cpu上下文切换而导致耗时
2.2 httpd与php结合的方式
httpd与php结合的方式有以下三种:
modules:php将以httpd的扩展模块形式存在,需要加载动态资源时,httpd可以直接通过php模块来加工资源并返回给客户端
httpd prefork:libphp5.so(多进程模型的php)
httpd event or worker:libphp5-zts.so(线程模型的php)
CGI:httpd需要加载动态资源时,通过CGI与php解释器联系,获得php执行的结果,此时httpd负责与php连接的建立和断开等
FastCGI:利用php-fpm机制,启动为服务进程,php自行运行为一个服务,https通过socket与php通信
较于CGI方式,FastCGI更为常用,很少有人使用CGI方式来加载动态资源
2.3 web工作流程
通过上面的图说明一下web的工作流程:
客户端通过http协议请求web服务器资源
web服务器收到请求后判断客户端请求的资源是静态资源或是动态资源
若是静态资源则直接从本地文件系统取之返回给客户端。
否则若为动态资源则通过FastCGI协议与php服务器联系,通过CGI程序的master进程调度worker进程来执行程序以获得客户端请求的动态资源,并将执行的结果通过FastCGI协议返回给httpd服务器,httpd服务器收到php的执行结果后将其封装为http响应报文响应给客户端。在执行程序获取动态资源时若需要获得数据库中的资源时,由Php服务器通过mysql协议与MySQL/MariaDB服务器交互,取之而后返回给httpd,httpd将从php服务器收到的执行结果封装成http响应报文响应给客户端。
3. lamp分离部署
环境说明:
| ip | 服务 |
|---|---|
| 192.168.47.134 | apache |
| 192.168.47.135 | mysql |
| 192.168.47.136 | php |
3.1 安装httpd
关闭防火墙和selinux
[root@ytserver1 ~]# systemctl stop firewalld
[root@ytserver1 ~]# systemctl disable firewalld
[root@ytserver1 ~]# getenforce
Disabled


安装开发工具包
[root@ytserver1 ~]# yum groups mark install 'Development Tools'

创建apache服务的用户和组
[root@ytserver1 ~]# groupadd -r apache
[root@ytserver1 ~]# useradd -r -M -s /sbin/nologin -g apache apache

安装依赖包
[root@ytserver1 ~]# yum -y install openssl-devel pcre-devel expat-devel libtool

下载和安装apr以及apr-util
[root@ytserver1 ~]# cd /usr/src/
[root@ytserver1 src]# wget http://mirror.bit.edu.cn/apache/apr/apr-1.6.5.tar.gz

[root@ytserver1 src]# wget http://mirror.bit.edu.cn/apache/apr/apr-util-1.6.1.tar.gz

[root@ytserver1 src]# ls
apr-1.6.5.tar.gz  apr-util-1.6.1.tar.gz  debug  kernels
[root@ytserver1 src]# tar xf apr-1.6.5.tar.gz
[root@ytserver1 src]# tar xf apr-util-1.6.1.tar.gz
[root@ytserver1 src]# ls
apr-1.6.5  apr-1.6.5.tar.gz  apr-util-1.6.1  apr-util-1.6.1.tar.gz  debug  kernels
[root@ytserver1 src]# cd apr-1.6.5
[root@ytserver1 apr-1.6.5]# vim configure


 cfgfile="${ofile}T"
    trap "$RM \"$cfgfile\"; exit 1" 1 2 15
    # $RM "$cfgfile"        //将此行加上注释,或者删除此行

[root@ytserver1 apr-1.6.5]# ./configure --prefix=/usr/local/apr
配置过程略...
[root@ytserver1 apr-1.6.5]# make && make install
编译安装过程略...

[root@ytserver1 apr-1.6.5]# cd /usr/src/apr-util-1.6.1
[root@ytserver1 apr-util-1.6.1]# ./configure --prefix=/usr/local/apr-util --with-apr=/usr/local/apr
配置过程略...
[root@ytserver1 apr-util-1.6.1]# make && make install
编译安装过程略...

//编译安装httpd
[root@ytserver1 ~]# wget http://mirror.bit.edu.cn/apache/httpd/httpd-2.4.38.tar.gz
[root@ytserver1 ~]# ls
httpd-2.4.38.tar.gz
[root@ytserver1 ~]# tar xf httpd-2.4.38.tar.gz
[root@ytserver1 ~]# cd httpd-2.4.38
[root@ytserver1 httpd-2.4.38]# ./configure --prefix=/usr/local/apache \
--sysconfdir=/etc/httpd24 \
--enable-so \
--enable-ssl \
--enable-cgi \
--enable-rewrite \
--with-zlib \
--with-pcre \
--with-apr=/usr/local/apr \
--with-apr-util=/usr/local/apr-util/ \
--enable-modules=most \
--enable-mpms-shared=all \
--with-mpm=prefork

[root@ytserver1 httpd-2.4.38]# make && make install
编译安装过程略…
//安装后配置
[root@ytserver1 ~]# echo 'export PATH=/usr/local/apache/bin:$PATH' > /etc/profile.d/httpd.sh
[root@ytserver1 ~]# source /etc/profile.d/httpd.sh
[root@ytserver1 ~]# ln -s /usr/local/apache/include/ /usr/include/httpd
[root@ytserver1 ~]# echo 'MANPATH /usr/local/apache/man' >> /etc/man.config
//取消ServerName前面的注释
[root@ytserver1 ~]# sed -i '/#ServerName/s/#//g' /etc/httpd24/httpd.conf
//启动apache
[root@ytserver1 ~]# ss -antl
State       Recv-Q Send-Q                                 Local Address:Port                                                Peer Address:Port
LISTEN      0      128                                                *:22                                                             *:*
LISTEN      0      100                                        127.0.0.1:25                                                             *:*
LISTEN      0      5                                                  *:873                                                            *:*
LISTEN      0      128                                               :::80                                                            :::*
LISTEN      0      128                                               :::22                                                            :::*
LISTEN      0      100                                              ::1:25                                                            :::
LISTEN      0      5                                                 :::873                                                           :::
3.2 安装mysql
关闭防火墙与selunx
[root@ytclient2 ~]# systemctl stop firewalld
[root@ytclient2 ~]# systemctl disable firewalld
[root@ytclient2 ~]# getenforce
Disabled
安装需要的工具包与编译工具
[root@ytclient1 ~]# yum -y install ncurses-devel openssl-devel openssl cmake mariadb-devel
[root@ytclient1 ~]# yum -y install gcc gcc-c++
创建用户和组
[root@ytclient1 ~]# groupadd -r -g 306 mysql
[root@ytclient1 ~]# useradd -M -s /sbin/nologin -g 306 -u 306 mysql
下载mysql的压缩包[root@ytclient1 ~]# cd /usr/src
[root@ytclient1 src]# wget https://downloads.mysql.com/archives/get/file/mysql-5.7.22-linux-glibc2.12-x86_64.tar.gz
--2019-08-11 14:25:58--  https://downloads.mysql.com/archives/get/file/mysql-5.7.22-linux-glibc2.12-x86_64.tar.gz
因为要很久所以在这我用的U盘上传的包
解压到指定的目录
[root@ytclient1 src]# tar xf mysql-5.7.22-linux-glibc2.12-x86_64.tar.gz -C /usr/local
[root@ytclient1 src]# ls
debug  kernels  mysql-5.7.22-linux-glibc2.12-x86_64  mysql-5.7.22-linux-glibc2.12-x86_64.tar.gz/
做软连接
[root@ytclient1 src]# cd /usr/local/
[root@ytclient1 local]# ls
bin  etc  games  include  lib  lib64  libexec  mysql-5.7.22-linux-glibc2.12-x86_64  sbin  share  src
[root@ytclient1 local]# ln -sv mysql-5.7.22-linux-glibc2.12-x86_64/ mysql
"mysql" -> "mysql-5.7.22-linux-glibc2.12-x86_64/"

修改目录/usr/local/mysql的属主属组
[root@ytclient1 local]# chown -R mysql.mysql /usr/local/mysql
添加环境变量
[root@ytclient1 local]# echo 'export PATH=/usr/local/mysql/bin:$PATH' > /etc/profile.d/mysql.sh
[root@ytclient1 local]# . /etc/profile.d/mysql.sh
[root@ytclient1 local]# echo $PATH
/usr/local/mysql/bin:/usr/local/sbin:/usr/local/bin:/usr/sbin:/usr/bin:/root/bin
建立数据库存放目录并修改属主属组为mysql
[root@ytclient1 ~]# mkdir /opt/data
[root@ytclient1 ~]# chown -R mysql.mysql /opt/data
[root@ytclient1 ~]# ll /opt
总用量 0
drwxr-xr-x 2 mysql mysql 6 8月  11 14:56 data
初始化数据库(注意最后会生成一个随机密码 一定要牢记)
[root@ytclient1 ~]# /usr/local/mysql/bin/mysqld --initialize --user=mysql --datadir=/opt/data/
2019-08-11T06:58:29.302459Z 0 [Warning] TIMESTAMP with implicit DEFAULT value is deprecated. Please use --explicit_defaults_for_timestamp server option (see documentation for more details).
2019-08-11T06:58:29.866712Z 0 [Warning] InnoDB: New log files created, LSN=45790
2019-08-11T06:58:29.980191Z 0 [Warning] InnoDB: Creating foreign key constraint system tables.
2019-08-11T06:58:30.246188Z 0 [Warning] No existing UUID has been found, so we assume that this is the first time that this server has been started. Generating a new UUID: 6d14ff4d-bc05-11e9-ad29-000c294b54e9.
2019-08-11T06:58:30.269828Z 0 [Warning] Gtid table is not ready to be used. Table 'mysql.gtid_executed' cannot be opened.
2019-08-11T06:58:30.271245Z 1 [Note] A temporary password is generated for root@localhost: ?3pS3ljuF-tx
这里我的数据库初始密码是 ?3pS3ljuF-tx
配置mysql
[root@ytclient1 ~]# ln -sv /usr/local/mysql/include/ /usr/local/include/mysql
[root@ytclient1 ~]# ln -sv /usr/local/mysql/include/ /usr/local/include/mysql
"/usr/local/include/mysql" -> "/usr/local/mysql/include/"
[root@ytclient1 ~]# echo '/usr/local/mysql/lib' > /etc/ld.so.conf.d/mysql.conf
[root@ytclient1 ~]# ldconfig -v
生成配置文件
[root@ytclient1 ~]# cat > /etc/my.cnf <<EOF
> [mysqld]
> basedir = /usr/local/mysql
> datadir = /opt/data
> socket = /tmp/mysql.sock
> port = 3306
> pid-file = /opt/data/mysql.pid
> user = mysql
> skip-name-resolve
> EOF
配置启动脚本并启动mysqld
[root@ytclient1 ~]# cp -a /usr/local/mysql/support-files/mysql.server /etc/init.d/mysqld
[root@ytclient1 ~]# sed -ri 's#^(basedir=).*#\1/usr/local/mysql#g' /etc/init.d/mysqld
[root@ytclient1 ~]# sed -ri 's#^(datadir=).*#\1/opt/data#g' /etc/init.d/mysqld
[root@ytclient1 ~]# service mysqld start

[root@ytclient1 ~]# ss -antl
State       Recv-Q Send-Q                                 Local Address:Port                                                Peer Address:Port
LISTEN      0      128                                                *:22                                                             *:*
LISTEN      0      100                                        127.0.0.1:25                                                             *:*
LISTEN      0      128                                               :::22                                                            :::*
LISTEN      0      100                                              ::1:25                                                            :::*
LISTEN      0      80                                                :::3306                                                          :::*
设置新密码 这里会用到刚刚的随机密码
[root@ytclient1 ~]# mysql -uroot -p?3pS3ljuF-tx
mysql> set password = password('123456');
Query OK, 0 rows affected, 1 warning (0.00 sec)
mysql> quit
新密码登陆验证
[root@ytclient1 ~]# mysql -uroot -p123456
mysql: [Warning] Using a password on the command line interface can be insecure.
Welcome to the MySQL monitor.  Commands end with ; or \g.
Your MySQL connection id is 3
Server version: 5.7.22 MySQL Community Server (GPL)

Copyright (c) 2000, 2018, Oracle and/or its affiliates. All rights reserved.

Oracle is a registered trademark of Oracle Corporation and/or its
affiliates. Other names may be trademarks of their respective
owners.

Type 'help;' or '\h' for help. Type '\c' to clear the current input statement.

mysql> quit
Bye
安装php:
先关闭防火墙和selinux 上面的配置有这一步过程
配置网络源,epel源,php源
[root@client2 ~]# cd /etc/yum.repos.d/
[root@client2 yum.repos.d]# wget http://mirrors.163.com/.help/CentOS7-Base-163.repo
[root@client2 yum.repos.d]# sed -i 's/\$releasever/7/g' /etc/yum.repos.d/CentOS7-Base-163.repo
[root@client2 yum.repos.d]# sed -i 's/^enabled=.*/enabled=1/g' /etc/yum.repos.d/CentOS7-Base-163.repo
[root@client2 yum.repos.d]# yum -y install epel-release
[root@client2 ~]# wget http://mirror.webtatic.com/yum/el7/webtatic-release.rpm
[root@client2 ~]# rpm -Uvh webtatic-release.rpm
安装依赖包 这里要把本地源清掉 然后清理缓存
[root@client2 ~]# yum -y install libxml2 libxml2-devel openssl openssl-devel bzip2 bzip2-devel libcurl libcurl-devel libicu-devel libjpeg libjpeg-devel libpng libpng-devel openldap-devel  libpcre-devel freetype freetype-devel gmp gmp-devel libmcrypt libmcrypt-devel readline readline-devel libxslt libxslt-devel mhash mhash-devel php72w-mysqlnd
下载php
[root@client2 ~]# cd /usr/src
[root@client2 src]# wget http://cn.php.net/distributions/php-7.2.8.tar.xz
[root@client2 src]# cd php-7.2.8
[root@client2 php-7.2.8]# ./configure --prefix=/usr/local/php7  \
--with-config-file-path=/etc \
--enable-fpm \
--enable-inline-optimization \
--disable-debug \
--disable-rpath \
--enable-shared \
--enable-soap \
--with-openssl \
--enable-bcmath \
--with-iconv \
--with-bz2 \
--enable-calendar \
--with-curl \
--enable-exif  \
--enable-ftp \
--with-gd \
--with-jpeg-dir \
--with-png-dir \
--with-zlib-dir \
--with-freetype-dir \
--with-gettext \
--enable-json \
--enable-mbstring \
--enable-pdo \
--with-mysqli=mysqlnd \
--with-pdo-mysql=mysqlnd \
--with-readline \
--enable-shmop \
--enable-simplexml \
--enable-sockets \
--enable-zip \
--enable-mysqlnd-compression-support \
--with-pear \
--enable-pcntl \
--enable-posix
[root@client2 php-7.2.8]# make  && make install
安装后配置
[root@client2 ~]# echo 'export PATH=/usr/local/php7/bin:$PATH' > /etc/profile.d/php7.sh
[root@client2 ~]# source /etc/profile.d/php7.sh
[root@client2 ~]# which php
/usr/local/php7/bin/php
[root@client2 ~]# php -v
PHP 7.2.8 (cli) (built: Aug 11 2019 18:37:16) ( NTS )
Copyright (c) 1997-2018 The PHP Group
Zend Engine v3.2.0, Copyright (c) 1998-2018 Zend Technologies
配置php-fpm
[root@client2 php-7.2.8]# cp php.ini-production /etc/php.ini
[root@client2 php-7.2.8]# cp sapi/fpm/init.d.php-fpm /etc/init.d/php-fpm
[root@client2 php-7.2.8]# chmod +x /etc/rc.d/init.d/php-fpm
[root@client2 php-7.2.8]# cp /usr/local/php7/etc/php-fpm.conf.default /usr/local/php7/etc/php-fpm.conf
[root@client2 php-7.2.8]# cp /usr/local/php7/etc/php-fpm.d/www.conf.default /usr/local/php7/etc/php-fpm.d/www.conf
在配置文件后加入
[root@client2 php-7.2.8]# vim /usr/local/php7/etc/php-fpm.conf
pm.max_children = 50
pm.start_servers = 5
pm.min_spare_servers = 2
pm.max_spare_servers = 8
启动php-fpm
[root@client2 php-7.2.8]# service php-fpm start
Starting php-fpm  done
[root@client2 php-7.2.8]# ss -antl
State       Recv-Q Send-Q                                 Local Address:Port                                                Peer Address:Port
LISTEN      0      128                                                *:22                                                             *:*
LISTEN      0      100                                        127.0.0.1:25                                                             *:*
LISTEN      0      128                                        127.0.0.1:9000                                                           *:*
LISTEN      0      128                                               :::22                                                            :::*
LISTEN      0      100                                              ::1:25                                                            :::*
[root@client2 php-7.2.8]# ps -ef |grep php
root      34159      1  0 18:45 ?        00:00:00 php-fpm: master process (/usr/local/php7/etc/php-fpm.conf)
nobody    34160  34159  0 18:45 ?        00:00:00 php-fpm: pool www
nobody    34161  34159  0 18:45 ?        00:00:00 php-fpm: pool www
nobody    34162  34159  0 18:45 ?        00:00:00 php-fpm: pool www
nobody    34163  34159  0 18:45 ?        00:00:00 php-fpm: pool www
nobody    34164  34159  0 18:45 ?        00:00:00 php-fpm: pool www
root      34175  12110  0 18:46 pts/1    00:00:00 grep --color=auto php
都安装完后去apache的主机上启用代理模块
[root@ytserver1 ~]# sed -i ‘/proxy_module/s/#//g’ /etc/httpd24/httpd.conf
[root@ytserver1 ~]# sed -i ‘/proxy_fcgi_module/s/#//g’ /etc/httpd24/httpd.conf
编辑配置文件并加入以下内容
[root@ytserver1 ~]# vim /etc/httpd24/httpd.conf
<VirtualHost *:80>
    DocumentRoot "/usr/local/apache/htdocs"
    ServerName www.yuetao.com
    ProxyRequests Off
    ProxyPassMatch ^/(.*\.php)$ fcgi://192.168.47.136:9000/www/yuetao/$1
    <Directory "/www/yuetao/">
        Options none
        AllowOverride none
        Require all granted
    </Directory>
</VirtualHost>
搜索AddType,添加以下内容
    AddType application/x-httpd-php .php
    AddType application/x-httpd-php-source .phps
[root@ytserver1 ~]# sed -i '/    DirectoryIndex/s/index.html/index.php index.html/g' /etc/httpd24/httpd.conf
php服务端
修改php-fpm的配置文件
[root@client2 ~]# vim /usr/local/php7/etc/php-fpm.d/www.conf
listen = 192.168.47.136:9000 # 找到此行将php主机的ip地址监听
;listen.allowed_clients = 192.168.47.134 #这里的ip改成apache主机的ip
保存退出
创建目录 和apache的配置文件对应
[root@client2 ~]# mkdir /www/yuetao -p
[root@client2 ~]# cd /www/yuetao/
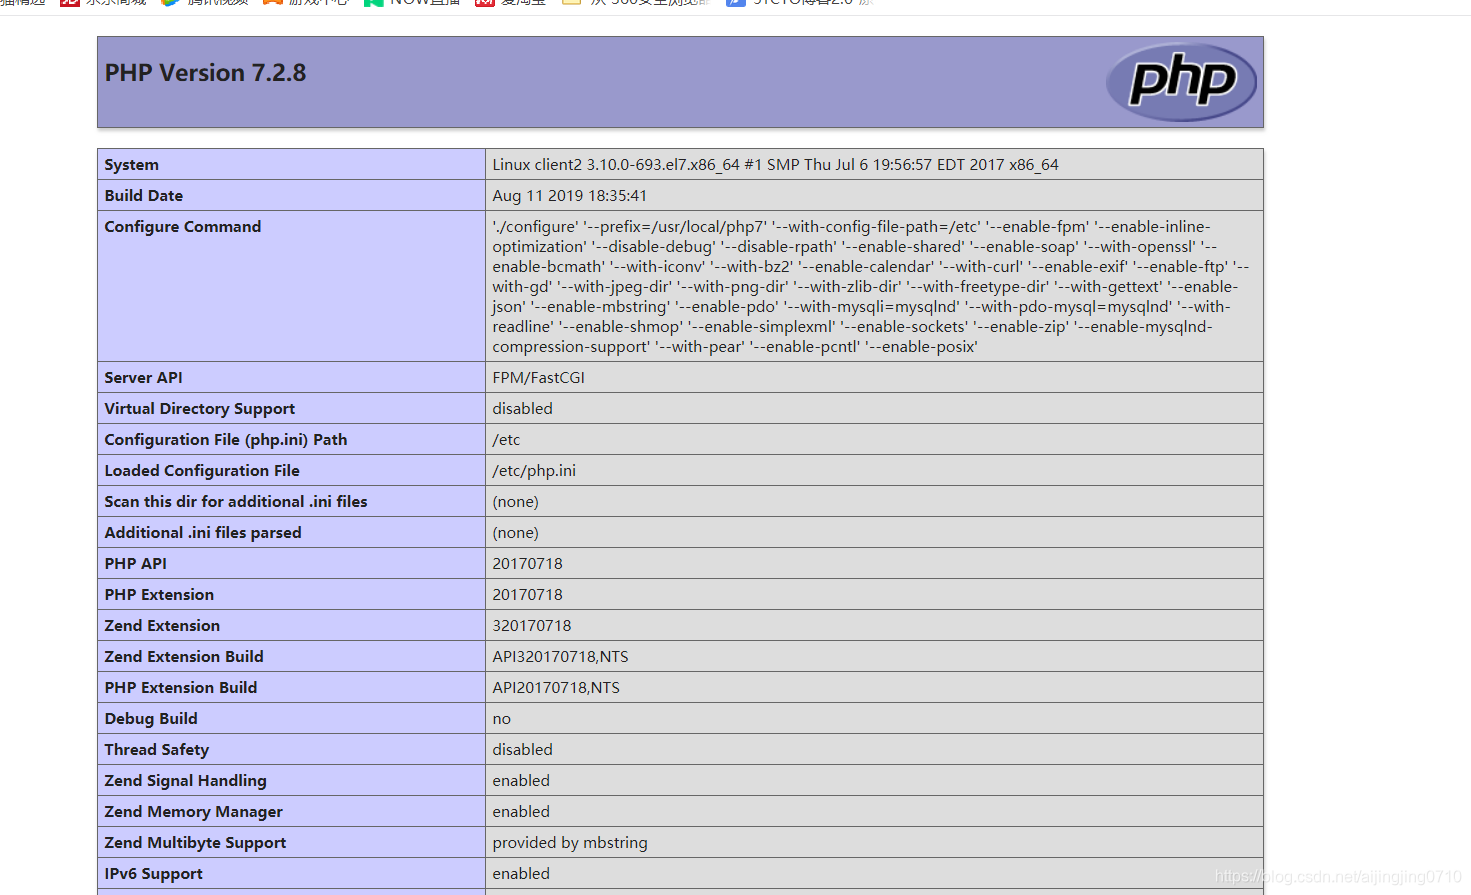
[root@client2 yuetao]# vim index.php #在里面写以下内容
<?php
phpinfo();
?>
分别在php和apache主机上重启服务
PHP
[root@client2 yuetao]# service php-fpm restart
Gracefully shutting down php-fpm . done
Starting php-fpm done
httpd
[root@ytserver1 ~]# apachectl stop
[root@ytserver1 ~]# apachectl start
在windows上修改hosts内容
加入httpd服务器的ip 和自己刚刚设置的域名 要对应
然后用浏览器访问
出现以下内容代表lamp搭建成功
接着搭建phpmyadmin
PHP主机上
下载压缩包
[root@client2 ~]# wget https://files.phpmyadmin.net/phpMyAdmin/4.0.10.20/phpMyAdmin-4.0.10.20-all-languages.zip
解压
[root@client2 ~]# unzip phpMyAdmin-4.0.10.20-all-languages.zip
修改名字
[root@client2 ~]# mv phpMyAdmin-4.0.10.20-all-languages phpMyAdmin
移动到刚刚搭建lamp上的httpd目录
[root@client2 ~]# mv phpMyAdmin /www/yuetao/
进入目录修改默认的配置文件
[root@client2 ~]# cd /www/yuetao/phpMyAdmin/
[root@client2 phpMyAdmin]# cp config.sample.inc.php config.inc.php
vim config.inc.php
$cfg['blowfish_secret'] = '123456'  #将这行的随机通信码换成自己想改的
$cfg['Servers'][$i]['host'] = '192.168.47.135';   #这里的ip换成数据库主机的ip
保存退出
重启服务
[root@client2 ~]# service php-fpm restart
Gracefully shutting down php-fpm . done
Starting php-fpm  done
[root@client2 ~]# ss -antl
State       Recv-Q Send-Q                                 Local Address:Port                                                Peer Address:Port
LISTEN      0      128                                                *:22                                                             *:*
LISTEN      0      100                                        127.0.0.1:25                                                             *:*
LISTEN      0      128                                   192.168.47.136:9000                                                           *:*
LISTEN      0      128                                               :::22                                                            :::*
LISTEN      0      100                                              ::1:25                                                            :::*
apache服务器上创建pfp-fpm上配置的phpMyAdmin目录
然后重启服务
[root@ytserver1 ~]# mkdir /usr/local/apache/htdocs/phpMyAdmin
[root@ytserver1 ~]# apachectl stop
httpd (no pid file) not running
[root@ytserver1 ~]# apachectl start
[root@ytserver1 ~]# ss -antl
State       Recv-Q Send-Q                                 Local Address:Port                                                Peer Address:Port
LISTEN      0      128                                                *:22                                                             *:*
LISTEN      0      100                                        127.0.0.1:25                                                             *:*
LISTEN      0      5                                                  *:873                                                            *:*
LISTEN      0      128                                               :::80                                                            :::*
LISTEN      0      128                                               :::22                                                            :::*
LISTEN      0      100                                              ::1:25                                                            :::*
LISTEN      0      5                                                 :::873                                                           :::*
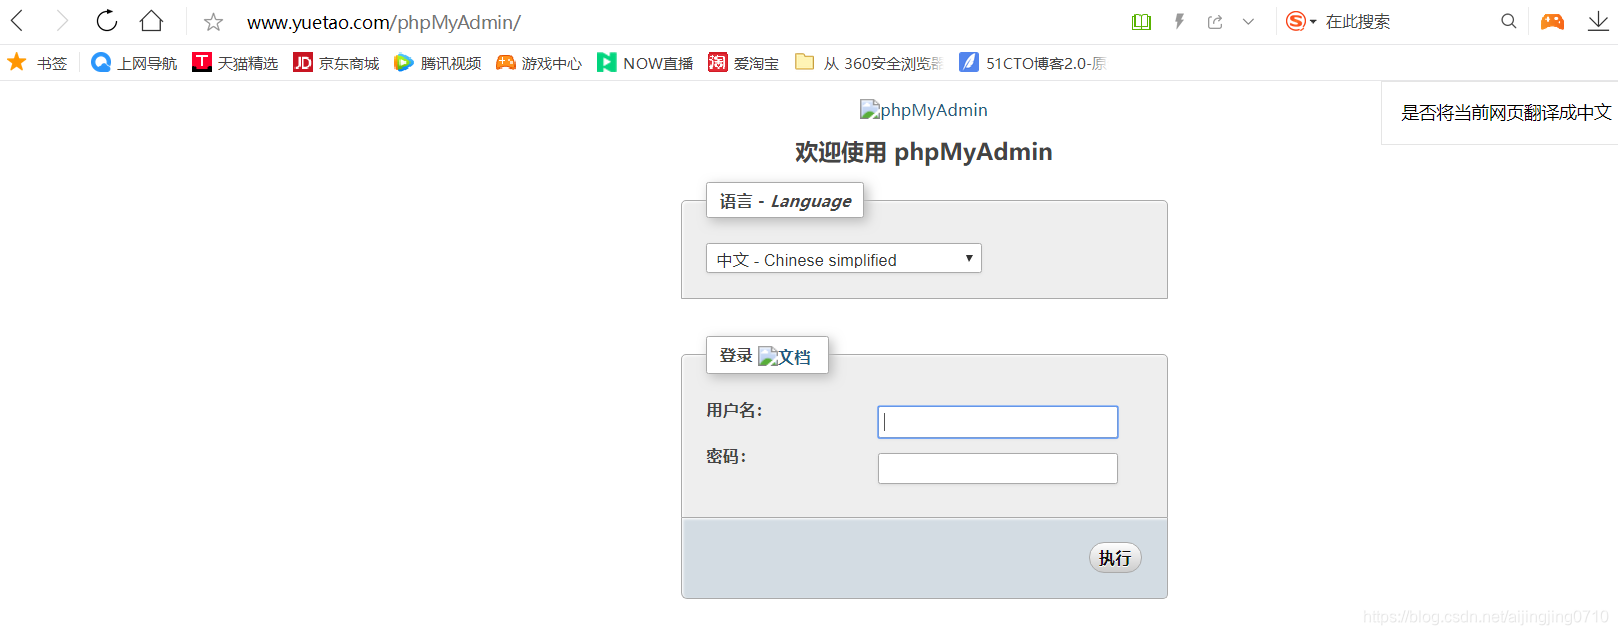
最后访问域名加目录 出现以下内容即成功
智能推荐
iOS -xcode 10 出现 :-1: Multiple commands produce ‘/Users/.../Library/Developer/Xcode/DerivedData/...._multiple commands produce '/users/yanyanli/library-程序员宅基地
文章浏览阅读6.4k次,点赞4次,收藏2次。错误提示如下::-1: Multiple commands produce '/Users/.../Library/Developer/Xcode/DerivedData/.../Build/Products/Dev-iphonesimulator/TLYShyNavBar/TLYShyNavBar.framework/Info.plist':1) Target 'TLYShyNavBar' has copy command from '/Users/.../Desktop/Workspace/_multiple commands produce '/users/yanyanli/library/developer/xcode/derivedda
【图像去噪】基于matlab GUI中值+小波+维纳+滤波器图像去噪(含PSNR)【含Matlab源码 616期】_matlab图像去噪-程序员宅基地
文章浏览阅读1.9k次,点赞4次,收藏15次。中值+小波+维纳+滤波器图像去噪(含PSNR)完整代码,直接运行,适合小白!可提供运行操作视频!_matlab图像去噪
faster rcnn解读【原理篇】-程序员宅基地
文章浏览阅读3.2k次。看了DL4CV的第三卷的15章faster rcnn之后,收获很多,特此做一下记录一.RCNNRCNN一共分为四步:step1:输入图片step2:采用selective search的方法获取潜在的roi,一共提取了2000个潜在roi,然后放入conv当中进行训练step3:使用迁移学习【用到了conv层】方法,提取step2的特征,从而获得最终的roiste...
深入理解HashMap:Java中的键值对存储利器-程序员宅基地
文章浏览阅读1.4k次,点赞21次,收藏14次。HashMap是Java中广泛使用的键值对存储结构,了解其内部结构和工作原理对于编写高效的Java程序至关重要。在多线程环境中,使用能够更好地保证线程安全性。通过合理选择参数和注意事项,可以充分发挥HashMap在实际应用中的优势。通过本文的介绍,希望读者对HashMap有更深入的理解,能够更加灵活地应用于实际项目中。祝大家学习愉快!
CAN总线在自动驾驶中的应用_自动驾驶开发 can版本-程序员宅基地
文章浏览阅读964次,点赞14次,收藏17次。随着技术的不断发展和社会对自动驾驶技术的接受度提高,自动驾驶技术有望在未来成为现实,为我们的生活带来更多便利和安全。它连接了车辆的各个部件和系统,实现了数据的实时传输和通讯,为自动驾驶车辆的正常运行和安全性提供了基础支持。此外,CAN总线还可以用于车辆的诊断和故障排除,以确保车辆的安全和可靠性。通过CAN总线,不同的模块和系统可以共享数据并协同工作,实现了车辆的智能化和自动化。此外,CAN总线还可以用于车辆的诊断和故障排除,以确保车辆的安全和可靠性。_自动驾驶开发 can版本
Debian安装和使用Elasticsearch教程-程序员宅基地
文章浏览阅读354次,点赞9次,收藏9次。请注意,以上是一个简要的安装和使用教程,实际操作中可能会涉及到更多的配置和细节。确保按照Elasticsearch官方文档进行操作,以获得最准确的安装和配置指导。打开终端,运行以下命令来添加Elasticsearch的APT仓库。运行以下命令来验证Elasticsearch是否在运行。运行以下命令来启动Elasticsearch服务。运行以下命令来安装Elasticsearch。
随便推点
简单线性回归截距假设检验_线性回归分析导论(原书第5版)-程序员宅基地
文章浏览阅读779次。译者序前言第1章 导引11.1 回归与建模11.2 数据收集41.3 回归的用途71.4 计算机的角色7第2章 简单线性回归92.1 简单线性回归模型92.2 回归参数的最小二乘估计92.2.1 β0与β1的估计92.2.2 最小二乘估计量的性质与回归模型拟合132.2.3 σ2的估计142.2.4 简单线性回归模型的另一种形式152.3 斜率与截距的假设检验152.3.1 使用t检验162.3...._线性回归分析导论下载
qt MainWindow设置layout失效_mainwindow setlayout无效果-程序员宅基地
文章浏览阅读451次。正确的做法:把layout设置到centralWidget上。错误的做法:直接把layout设置到MainWindow上。_mainwindow setlayout无效果
最新网络监视工具列表_monitoring tool for database clients-程序员宅基地
文章浏览阅读1w次。 引用: 名称: 事项001 描述: 翻译由斯坦福大学维护的最新网络监视工具列表. http://www.slac.stanford.edu/xorg/nmtf/nmtf-tools.html 执行人: leechael 启动时间: 2006-04-24 _monitoring tool for database clients
[论文阅读笔记]Learning Memory-guided Normality for Anomaly Detection-程序员宅基地
文章浏览阅读3.9k次,点赞5次,收藏28次。论文发表年限:CVPR,2020作者:Hyunjong Park、Jongyoun Noh、Bumsub Ham论文下载地址:Learning Memory-guided Normality for Anomaly Detectiongithub地址:https://github.com/cvlab-yonsei/MNAD摘要:异常检测、无监督Motivation现有的方法没有考虑到正常行为(normal)的多样性。同时强大的CNN网络能够重构异常行为(abnormal),导致不能检测出异常行为
android http请求实例,android平台HttpGet、HttpPost请求实例-程序员宅基地
文章浏览阅读81次。/***description:Android HttpPost()*authour:YanEr·Gates*website:https://www.jb51.net*/package me.gogogoog;import java.io.IOException;import java.util.ArrayList;import java.util.List;import org.apache.h..._android 网络请求http案例
python中def _init_是什么意思_详细解读Python中的__init__()方法-程序员宅基地
文章浏览阅读3.5k次。__init__()方法意义重大的原因有两个。第一个原因是在对象生命周期中初始化是最重要的一步;每个对象必须正确初始化后才能正常工作。第二个原因是__init__()参数值可以有多种形式。因为有很多种方式为__init__()提供参数值,对于对象创建有大量的用例,我们可以看看其中的几个。我们想尽可能的弄清楚,因此我们需要定义一个初始化来正确的描述问题区域。在我们接触__init__()方法之前,无..._def __init__