android连接蓝牙打印机实现打印功能_android编写蓝牙打印功能程序-程序员宅基地
技术标签: android基础
原文地址:http://blog.csdn.net/reality_jie_blog/article/details/11895843
最近在做一个安卓应用,其中有一个需求是要求用蓝牙连接打印机实现打印功能。一开始没有一点头绪,网上找了很多资料也找不到有用的数据。所以自己就去研究,最终,功夫不负有心人,顺利的完成了这个功能。下边贴出我写的代码,共有需要的IT哥们参考学习。
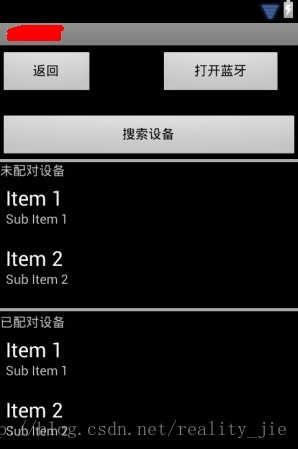
我们先看看运行效果图吧。。。
1.这是主界面的效果图
贴上布局文件的代码:bluetooth_layout.xml
- <span style="font-size:12px"><?xml version="1.0" encoding="utf-8"?>
- <RelativeLayout
- android:layout_width="match_parent"
- android:layout_height="match_parent" >
- <Button
- android:id="@+id/openBluetooth_tb"
- android:layout_width="130dp"
- android:layout_height="wrap_content"
- android:layout_alignParentRight="true"
- android:layout_marginRight="18dp"
- android:layout_marginTop="5dp"
- android:text="打开蓝牙" />
- <Button
- android:id="@+id/searchDevices"
- android:layout_width="match_parent"
- android:layout_height="wrap_content"
- android:layout_alignParentLeft="true"
- android:layout_below="@+id/openBluetooth_tb"
- android:layout_marginTop="20dp"
- android:text="搜索设备" />
- <View
- android:layout_width="match_parent"
- android:layout_height="3dp"
- android:layout_alignParentLeft="true"
- android:layout_below="@+id/searchDevices"
- android:background="@android:color/darker_gray" />
- <LinearLayout
- android:id="@+id/linearLayout1"
- android:layout_width="match_parent"
- android:layout_height="150dp"
- android:layout_marginTop="125dp"
- android:orientation="vertical" >
- <TextView
- android:layout_width="match_parent"
- android:layout_height="wrap_content"
- android:text="未配对设备" />
- <ListView
- android:id="@+id/unbondDevices"
- android:layout_width="wrap_content"
- android:layout_height="wrap_content" />
- </LinearLayout>
- <View
- android:layout_width="match_parent"
- android:layout_height="3dp"
- android:layout_alignParentLeft="true"
- android:layout_below="@+id/searchDevices"
- android:layout_marginTop="160dp"
- android:background="@android:color/darker_gray" />
- <LinearLayout
- android:layout_width="match_parent"
- android:layout_height="190dp"
- android:layout_marginTop="288dp"
- android:orientation="vertical" >
- <TextView
- android:layout_width="match_parent"
- android:layout_height="wrap_content"
- android:text="已配对设备" />
- <ListView
- android:id="@+id/bondDevices"
- android:layout_width="wrap_content"
- android:layout_height="wrap_content"
- android:layout_alignParentLeft="true"
- android:layout_below="@+id/linearLayout1" >
- </ListView>
- </LinearLayout>
- <Button
- android:id="@+id/return_Bluetooth_btn"
- android:layout_width="100dp"
- android:layout_height="wrap_content"
- android:layout_above="@+id/searchDevices"
- android:layout_alignParentLeft="true"
- android:text="返回" />
- </RelativeLayout></span>
从上边的布局文件中不难看出,其中有两个ListView,OK,那下边贴出对应的两个item布局文件
--> 第一个item:unbonddevice_item.xml
- <span style="font-size:14px"><?xml version="1.0" encoding="utf-8"?>
- <RelativeLayout
- android:layout_width="match_parent"
- android:layout_height="match_parent" >
- <TextView
- android:id="@+id/device_name"
- android:layout_width="match_parent"
- android:layout_height="wrap_content"
- android:layout_alignParentLeft="true"
- android:layout_alignParentTop="true"
- android:text="未绑定设备"
- android:textAppearance="?android:attr/textAppearanceLarge" />
- </RelativeLayout></span>
-->第二个item:bonddevice_item.xml
- <span style="font-size:14px"><?xml version="1.0" encoding="utf-8"?>
- <RelativeLayout
- android:layout_width="match_parent"
- android:layout_height="match_parent" >
- <TextView
- android:id="@+id/device_name"
- android:layout_width="match_parent"
- android:layout_height="wrap_content"
- android:layout_alignParentLeft="true"
- android:layout_alignParentTop="true"
- android:text="已绑定设备"
- android:textAppearance="?android:attr/textAppearanceLarge" />
- </RelativeLayout></span>
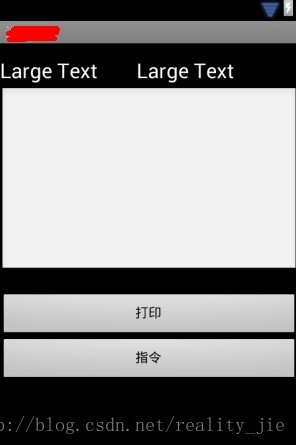
2.还有另外一个布局文件,就是当点击已绑定蓝牙设备下边的某个item时进入打印的界面,不多说,看图!
代码如下:printdata_layout.xml
- <?xml version="1.0" encoding="utf-8"?>
- <RelativeLayout
- android:layout_width="match_parent"
- android:layout_height="match_parent" >
- <EditText
- android:id="@+id/print_data"
- android:layout_width="match_parent"
- android:layout_height="200dp"
- android:layout_alignParentLeft="true"
- android:layout_alignParentTop="true"
- android:layout_marginTop="46dp" >
- </EditText>
- <TextView
- android:id="@+id/device_name"
- android:layout_width="wrap_content"
- android:layout_height="wrap_content"
- android:layout_alignParentLeft="true"
- android:layout_alignParentTop="true"
- android:layout_marginTop="16dp"
- android:text="Large Text"
- android:textAppearance="?android:attr/textAppearanceLarge" />
- <TextView
- android:id="@+id/connect_state"
- android:layout_width="wrap_content"
- android:layout_height="wrap_content"
- android:layout_alignBaseline="@+id/device_name"
- android:layout_alignBottom="@+id/device_name"
- android:layout_marginLeft="42dp"
- android:layout_toRightOf="@+id/device_name"
- android:text="Large Text"
- android:textAppearance="?android:attr/textAppearanceLarge" />
- <Button
- android:id="@+id/send"
- android:layout_width="match_parent"
- android:layout_height="wrap_content"
- android:layout_alignParentLeft="true"
- android:layout_below="@+id/print_data"
- android:layout_marginTop="21dp"
- android:text="打印" />
- <Button
- android:id="@+id/command"
- android:layout_width="match_parent"
- android:layout_height="wrap_content"
- android:layout_alignParentLeft="true"
- android:layout_below="@+id/send"
- android:text="指令" />
- </RelativeLayout>
至此,布局文件就搞定了,接下来就要编写java代码了。主要有一下这么几个类,一个一个来哈
BluetoothActivity.java
这个类的主要作用是初始化主界面,看代码
- public class BluetoothActivity extends Activity {
- private Context context = null;
- public void onCreate(Bundle savedInstanceState) {
- super.onCreate(savedInstanceState);
- this.context = this;
- setTitle("蓝牙打印");
- setContentView(R.layout.bluetooth_layout);
- this.initListener();
- }
- private void initListener() {
- ListView unbondDevices = (ListView) this
- .findViewById(R.id.unbondDevices);
- ListView bondDevices = (ListView) this.findViewById(R.id.bondDevices);
- Button switchBT = (Button) this.findViewById(R.id.openBluetooth_tb);
- Button searchDevices = (Button) this.findViewById(R.id.searchDevices);
- BluetoothAction bluetoothAction = new BluetoothAction(this.context,
- unbondDevices, bondDevices, switchBT, searchDevices,
- BluetoothActivity.this);
- Button returnButton = (Button) this
- .findViewById(R.id.return_Bluetooth_btn);
- bluetoothAction.setSearchDevices(searchDevices);
- bluetoothAction.initView();
- switchBT.setOnClickListener(bluetoothAction);
- searchDevices.setOnClickListener(bluetoothAction);
- returnButton.setOnClickListener(bluetoothAction);
- }
- //屏蔽返回键的代码:
- public boolean onKeyDown(int keyCode,KeyEvent event)
- {
- switch(keyCode)
- {
- case KeyEvent.KEYCODE_BACK:return true;
- }
- return super.onKeyDown(keyCode, event);
- }
- }
BluetoothAction.java
这个类顾名思义,是处理bluetoothActivity中各种操作事件的action类,看代码
- <span style="font-size:14px">public class BluetoothAction implements OnClickListener {
- private Button switchBT = null;
- private Button searchDevices = null;
- private Activity activity = null;
- private ListView unbondDevices = null;
- private ListView bondDevices = null;
- private Context context = null;
- private BluetoothService bluetoothService = null;
- public BluetoothAction(Context context, ListView unbondDevices,
- ListView bondDevices, Button switchBT, Button searchDevices,
- Activity activity) {
- super();
- this.context = context;
- this.unbondDevices = unbondDevices;
- this.bondDevices = bondDevices;
- this.switchBT = switchBT;
- this.searchDevices = searchDevices;
- this.activity = activity;
- this.bluetoothService = new BluetoothService(this.context,
- this.unbondDevices, this.bondDevices, this.switchBT,
- this.searchDevices);
- }
- public void setSwitchBT(Button switchBT) {
- this.switchBT = switchBT;
- }
- public void setSearchDevices(Button searchDevices) {
- this.searchDevices = searchDevices;
- }
- public void setUnbondDevices(ListView unbondDevices) {
- this.unbondDevices = unbondDevices;
- }
- /**
- * 初始化界面
- */
- public void initView() {
- if (this.bluetoothService.isOpen()) {
- System.out.println("蓝牙有开!");
- switchBT.setText("关闭蓝牙");
- }
- if (!this.bluetoothService.isOpen()) {
- System.out.println("蓝牙没开!");
- this.searchDevices.setEnabled(false);
- }
- }
- private void searchDevices() {
- bluetoothService.searchDevices();
- }
- /**
- * 各种按钮的监听
- */
- @Override
- public void onClick(View v) {
- if (v.getId() == R.id.searchDevices) {
- this.searchDevices();
- } else if (v.getId() == R.id.return_Bluetooth_btn) {
- activity.finish();
- } else if (v.getId() == R.id.openBluetooth_tb) {
- if (!this.bluetoothService.isOpen()) {
- // 蓝牙关闭的情况
- System.out.println("蓝牙关闭的情况");
- this.bluetoothService.openBluetooth(activity);
- } else {
- // 蓝牙打开的情况
- System.out.println("蓝牙打开的情况");
- this.bluetoothService.closeBluetooth();
- }
- }
- }
- }</span>
这个类会把各种请求动作分门别类,交给BluetoothService.java来处理,看代码
- public class BluetoothService {
- private Context context = null;
- private BluetoothAdapter bluetoothAdapter = BluetoothAdapter
- .getDefaultAdapter();
- private ArrayList<BluetoothDevice> unbondDevices = null; // 用于存放未配对蓝牙设备
- private ArrayList<BluetoothDevice> bondDevices = null;// 用于存放已配对蓝牙设备
- private Button switchBT = null;
- private Button searchDevices = null;
- private ListView unbondDevicesListView = null;
- private ListView bondDevicesListView = null;
- /**
- * 添加已绑定蓝牙设备到ListView
- */
- private void addBondDevicesToListView() {
- ArrayList<HashMap<String, Object>> data = new ArrayList<HashMap<String, Object>>();
- int count = this.bondDevices.size();
- System.out.println("已绑定设备数量:" + count);
- for (int i = 0; i < count; i++) {
- HashMap<String, Object> map = new HashMap<String, Object>();
- map.put("deviceName", this.bondDevices.get(i).getName());
- data.add(map);// 把item项的数据加到data中
- }
- String[] from = { "deviceName" };
- int[] to = { R.id.device_name };
- SimpleAdapter simpleAdapter = new SimpleAdapter(this.context, data,
- R.layout.bonddevice_item, from, to);
- // 把适配器装载到listView中
- this.bondDevicesListView.setAdapter(simpleAdapter);
- this.bondDevicesListView
- .setOnItemClickListener(new OnItemClickListener() {
- @Override
- public void onItemClick(AdapterView<?> arg0, View arg1,
- int arg2, long arg3) {
- BluetoothDevice device = bondDevices.get(arg2);
- Intent intent = new Intent();
- intent.setClassName(context,
- "com.lifeng.jdxt.view.PrintDataActivity");
- intent.putExtra("deviceAddress", device.getAddress());
- context.startActivity(intent);
- }
- });
- }
- /**
- * 添加未绑定蓝牙设备到ListView
- */
- private void addUnbondDevicesToListView() {
- ArrayList<HashMap<String, Object>> data = new ArrayList<HashMap<String, Object>>();
- int count = this.unbondDevices.size();
- System.out.println("未绑定设备数量:" + count);
- for (int i = 0; i < count; i++) {
- HashMap<String, Object> map = new HashMap<String, Object>();
- map.put("deviceName", this.unbondDevices.get(i).getName());
- data.add(map);// 把item项的数据加到data中
- }
- String[] from = { "deviceName" };
- int[] to = { R.id.device_name };
- SimpleAdapter simpleAdapter = new SimpleAdapter(this.context, data,
- R.layout.unbonddevice_item, from, to);
- // 把适配器装载到listView中
- this.unbondDevicesListView.setAdapter(simpleAdapter);
- // 为每个item绑定监听,用于设备间的配对
- this.unbondDevicesListView
- .setOnItemClickListener(new OnItemClickListener() {
- @Override
- public void onItemClick(AdapterView<?> arg0, View arg1,
- int arg2, long arg3) {
- try {
- Method createBondMethod = BluetoothDevice.class
- .getMethod("createBond");
- createBondMethod
- .invoke(unbondDevices.get(arg2));
- // 将绑定好的设备添加的已绑定list集合
- bondDevices.add(unbondDevices.get(arg2));
- // 将绑定好的设备从未绑定list集合中移除
- unbondDevices.remove(arg2);
- addBondDevicesToListView();
- addUnbondDevicesToListView();
- } catch (Exception e) {
- Toast.makeText(context, "配对失败!", Toast.LENGTH_SHORT)
- .show();
- }
- }
- });
- }
- public BluetoothService(Context context, ListView unbondDevicesListView,
- ListView bondDevicesListView, Button switchBT, Button searchDevices) {
- this.context = context;
- this.unbondDevicesListView = unbondDevicesListView;
- this.bondDevicesListView = bondDevicesListView;
- // this.bluetoothAdapter = BluetoothAdapter.getDefaultAdapter();
- this.unbondDevices = new ArrayList<BluetoothDevice>();
- this.bondDevices = new ArrayList<BluetoothDevice>();
- this.switchBT = switchBT;
- this.searchDevices = searchDevices;
- this.initIntentFilter();
- }
- private void initIntentFilter() {
- // 设置广播信息过滤
- IntentFilter intentFilter = new IntentFilter();
- intentFilter.addAction(BluetoothDevice.ACTION_FOUND);
- intentFilter.addAction(BluetoothAdapter.ACTION_DISCOVERY_STARTED);
- intentFilter.addAction(BluetoothAdapter.ACTION_DISCOVERY_FINISHED);
- intentFilter.addAction(BluetoothAdapter.ACTION_STATE_CHANGED);
- // 注册广播接收器,接收并处理搜索结果
- context.registerReceiver(receiver, intentFilter);
- }
- /**
- * 打开蓝牙
- */
- public void openBluetooth(Activity activity) {
- Intent enableBtIntent = new Intent(
- BluetoothAdapter.ACTION_REQUEST_ENABLE);
- activity.startActivityForResult(enableBtIntent, 1);
- }
- /**
- * 关闭蓝牙
- */
- public void closeBluetooth() {
- this.bluetoothAdapter.disable();
- }
- /**
- * 判断蓝牙是否打开
- *
- * @return boolean
- */
- public boolean isOpen() {
- return this.bluetoothAdapter.isEnabled();
- }
- /**
- * 搜索蓝牙设备
- */
- public void searchDevices() {
- this.bondDevices.clear();
- this.unbondDevices.clear();
- // 寻找蓝牙设备,android会将查找到的设备以广播形式发出去
- this.bluetoothAdapter.startDiscovery();
- }
- /**
- * 添加未绑定蓝牙设备到list集合
- *
- * @param device
- */
- public void addUnbondDevices(BluetoothDevice device) {
- System.out.println("未绑定设备名称:" + device.getName());
- if (!this.unbondDevices.contains(device)) {
- this.unbondDevices.add(device);
- }
- }
- /**
- * 添加已绑定蓝牙设备到list集合
- *
- * @param device
- */
- public void addBandDevices(BluetoothDevice device) {
- System.out.println("已绑定设备名称:" + device.getName());
- if (!this.bondDevices.contains(device)) {
- this.bondDevices.add(device);
- }
- }
- /**
- * 蓝牙广播接收器
- */
- private BroadcastReceiver receiver = new BroadcastReceiver() {
- ProgressDialog progressDialog = null;
- @Override
- public void onReceive(Context context, Intent intent) {
- String action = intent.getAction();
- if (BluetoothDevice.ACTION_FOUND.equals(action)) {
- BluetoothDevice device = intent
- .getParcelableExtra(BluetoothDevice.EXTRA_DEVICE);
- if (device.getBondState() == BluetoothDevice.BOND_BONDED) {
- addBandDevices(device);
- } else {
- addUnbondDevices(device);
- }
- } else if (BluetoothAdapter.ACTION_DISCOVERY_STARTED.equals(action)) {
- progressDialog = ProgressDialog.show(context, "请稍等...",
- "搜索蓝牙设备中...", true);
- } else if (BluetoothAdapter.ACTION_DISCOVERY_FINISHED
- .equals(action)) {
- System.out.println("设备搜索完毕");
- progressDialog.dismiss();
- addUnbondDevicesToListView();
- addBondDevicesToListView();
- // bluetoothAdapter.cancelDiscovery();
- }
- if (BluetoothAdapter.ACTION_STATE_CHANGED.equals(action)) {
- if (bluetoothAdapter.getState() == BluetoothAdapter.STATE_ON) {
- System.out.println("--------打开蓝牙-----------");
- switchBT.setText("关闭蓝牙");
- searchDevices.setEnabled(true);
- bondDevicesListView.setEnabled(true);
- unbondDevicesListView.setEnabled(true);
- } else if (bluetoothAdapter.getState() == BluetoothAdapter.STATE_OFF) {
- System.out.println("--------关闭蓝牙-----------");
- switchBT.setText("打开蓝牙");
- searchDevices.setEnabled(false);
- bondDevicesListView.setEnabled(false);
- unbondDevicesListView.setEnabled(false);
- }
- }
- }
- };
- }
到这里,第一个界面的代码就写完了,当我们点击要打印的蓝牙设备时就会跳转到打印页面,跳转代码在BluetoothService.java的addBondDevicesToListView()中
接下来让我们来看看第二个界面的代码,结构和第一个界面的代码一样,分类三个类,请看代码。。。。。
PrintDataActivity.java
- public class PrintDataActivity extends Activity {
- private Context context = null;
- public void onCreate(Bundle savedInstanceState) {
- super.onCreate(savedInstanceState);
- this.setTitle("蓝牙打印");
- this.setContentView(R.layout.printdata_layout);
- this.context = this;
- this.initListener();
- }
- /**
- * 获得从上一个Activity传来的蓝牙地址
- * @return String
- */
- private String getDeviceAddress() {
- // 直接通过Context类的getIntent()即可获取Intent
- Intent intent = this.getIntent();
- // 判断
- if (intent != null) {
- return intent.getStringExtra("deviceAddress");
- } else {
- return null;
- }
- }
- private void initListener() {
- TextView deviceName = (TextView) this.findViewById(R.id.device_name);
- TextView connectState = (TextView) this
- .findViewById(R.id.connect_state);
- PrintDataAction printDataAction = new PrintDataAction(this.context,
- this.getDeviceAddress(), deviceName, connectState);
- EditText printData = (EditText) this.findViewById(R.id.print_data);
- Button send = (Button) this.findViewById(R.id.send);
- Button command = (Button) this.findViewById(R.id.command);
- printDataAction.setPrintData(printData);
- send.setOnClickListener(printDataAction);
- command.setOnClickListener(printDataAction);
- }
- @Override
- protected void onDestroy() {
- PrintDataService.disconnect();
- super.onDestroy();
- }
- }
PrintDataAction.java
- <span style="font-size:14px">public class PrintDataAction implements OnClickListener {
- private Context context = null;
- private TextView deviceName = null;
- private TextView connectState = null;
- private EditText printData = null;
- private String deviceAddress = null;
- private PrintDataService printDataService = null;
- public PrintDataAction(Context context, String deviceAddress,
- TextView deviceName, TextView connectState) {
- super();
- this.context = context;
- this.deviceAddress = deviceAddress;
- this.deviceName = deviceName;
- this.connectState = connectState;
- this.printDataService = new PrintDataService(this.context,
- this.deviceAddress);
- this.initView();
- }
- private void initView() {
- // 设置当前设备名称
- this.deviceName.setText(this.printDataService.getDeviceName());
- // 一上来就先连接蓝牙设备
- boolean flag = this.printDataService.connect();
- if (flag == false) {
- // 连接失败
- this.connectState.setText("连接失败!");
- } else {
- // 连接成功
- this.connectState.setText("连接成功!");
- }
- }
- public void setPrintData(EditText printData) {
- this.printData = printData;
- }
- @Override
- public void onClick(View v) {
- if (v.getId() == R.id.send) {
- String sendData = this.printData.getText().toString();
- this.printDataService.send(sendData + "\n");
- } else if (v.getId() == R.id.command) {
- this.printDataService.selectCommand();
- }
- }
- }</span>
PrintDataService.java
- <span style="font-size:14px">public class PrintDataService {
- private Context context = null;
- private String deviceAddress = null;
- private BluetoothAdapter bluetoothAdapter = BluetoothAdapter
- .getDefaultAdapter();
- private BluetoothDevice device = null;
- private static BluetoothSocket bluetoothSocket = null;
- private static OutputStream outputStream = null;
- private static final UUID uuid = UUID
- .fromString("00001101-0000-1000-8000-00805F9B34FB");
- private boolean isConnection = false;
- final String[] items = { "复位打印机", "标准ASCII字体", "压缩ASCII字体", "字体不放大",
- "宽高加倍", "取消加粗模式", "选择加粗模式", "取消倒置打印", "选择倒置打印", "取消黑白反显", "选择黑白反显",
- "取消顺时针旋转90°", "选择顺时针旋转90°" };
- final byte[][] byteCommands = { { 0x1b, 0x40 },// 复位打印机
- { 0x1b, 0x4d, 0x00 },// 标准ASCII字体
- { 0x1b, 0x4d, 0x01 },// 压缩ASCII字体
- { 0x1d, 0x21, 0x00 },// 字体不放大
- { 0x1d, 0x21, 0x11 },// 宽高加倍
- { 0x1b, 0x45, 0x00 },// 取消加粗模式
- { 0x1b, 0x45, 0x01 },// 选择加粗模式
- { 0x1b, 0x7b, 0x00 },// 取消倒置打印
- { 0x1b, 0x7b, 0x01 },// 选择倒置打印
- { 0x1d, 0x42, 0x00 },// 取消黑白反显
- { 0x1d, 0x42, 0x01 },// 选择黑白反显
- { 0x1b, 0x56, 0x00 },// 取消顺时针旋转90°
- { 0x1b, 0x56, 0x01 },// 选择顺时针旋转90°
- };
- public PrintDataService(Context context, String deviceAddress) {
- super();
- this.context = context;
- this.deviceAddress = deviceAddress;
- this.device = this.bluetoothAdapter.getRemoteDevice(this.deviceAddress);
- }
- /**
- * 获取设备名称
- *
- * @return String
- */
- public String getDeviceName() {
- return this.device.getName();
- }
- /**
- * 连接蓝牙设备
- */
- public boolean connect() {
- if (!this.isConnection) {
- try {
- bluetoothSocket = this.device
- .createRfcommSocketToServiceRecord(uuid);
- bluetoothSocket.connect();
- outputStream = bluetoothSocket.getOutputStream();
- this.isConnection = true;
- if (this.bluetoothAdapter.isDiscovering()) {
- System.out.println("关闭适配器!");
- this.bluetoothAdapter.isDiscovering();
- }
- } catch (Exception e) {
- Toast.makeText(this.context, "连接失败!", 1).show();
- return false;
- }
- Toast.makeText(this.context, this.device.getName() + "连接成功!",
- Toast.LENGTH_SHORT).show();
- return true;
- } else {
- return true;
- }
- }
- /**
- * 断开蓝牙设备连接
- */
- public static void disconnect() {
- System.out.println("断开蓝牙设备连接");
- try {
- bluetoothSocket.close();
- outputStream.close();
- } catch (IOException e) {
- // TODO Auto-generated catch block
- e.printStackTrace();
- }
- }
- /**
- * 选择指令
- */
- public void selectCommand() {
- new AlertDialog.Builder(context).setTitle("请选择指令")
- .setItems(items, new DialogInterface.OnClickListener() {
- @Override
- public void onClick(DialogInterface dialog, int which) {
- try {
- outputStream.write(byteCommands[which]);
- } catch (IOException e) {
- Toast.makeText(context, "设置指令失败!",
- Toast.LENGTH_SHORT).show();
- }
- }
- }).create().show();
- }
- /**
- * 发送数据
- */
- public void send(String sendData) {
- if (this.isConnection) {
- System.out.println("开始打印!!");
- try {
- byte[] data = sendData.getBytes("gbk");
- outputStream.write(data, 0, data.length);
- outputStream.flush();
- } catch (IOException e) {
- Toast.makeText(this.context, "发送失败!", Toast.LENGTH_SHORT)
- .show();
- }
- } else {
- Toast.makeText(this.context, "设备未连接,请重新连接!", Toast.LENGTH_SHORT)
- .show();
- }
- }
- }</span>
 到此,全部代码贴完,也就大功告成了
对了对了,差点忘记一件很重要的事情!!清单文件忘记给权限啦!!
权限
- <span style="font-size:14px"><uses-permission android:name="android.permission.BLUETOOTH" />
- <uses-permission android:name="android.permission.BLUETOOTH_ADMIN" /> </span>
注册Activity
- <span style="font-size:14px"><activity android:name=".BluetoothActivity" />
- <activity android:name=".PrintDataActivity" /> </span><span style="font-size:14px">
- </span>
 这下子就真的搞定了!
智能推荐
第三十六篇、基于Arduino uno,获取红外寻迹传感器的原始值——结果导向_怎么检测红外寻迹模块返回值-程序员宅基地
文章浏览阅读385次。基于Arduino uno,获取红外寻迹传感器的原始值_怎么检测红外寻迹模块返回值
基于单片机的无线投票显示系统设计-程序员宅基地
文章浏览阅读494次,点赞5次,收藏9次。单片机(Microcontroller)是一种集成了微处理器核心、存储器、输入/输出接口和定时器等功能模块的集成电路芯片,具有体积小、功耗低、性价比高等特点,被广泛应用于各个领域。单片机的发展历史可以追溯到20世纪70年代,当时的单片机功能有限,主要用于简单的控制任务。
生成对抗网络GAN_生成对抗网络 python代码-程序员宅基地
文章浏览阅读412次。https://zhuanlan.zhihu.com/p/54096381_生成对抗网络 python代码
html——网页上添加表格_怎样在网站中添加表格别人可以下载-程序员宅基地
文章浏览阅读5.2k次,点赞7次,收藏18次。有时候我们需要在网页上展示一些数据,如某公司想在网页上展示公司的库存清单。如下表:想在网页上展示上述表格效果可以使用以下代码:创建表格的四个元素:table、tbody、tr、th、td1、…:整个表格以标记开始、标记结束。2、…:当表格内容非常多时,表格会下载一点显示一点,但如果加上标签后,这个表格就要等表格内容全部下载完才会显示。如右侧代码编辑器中的代码。3、…_怎样在网站中添加表格别人可以下载
《Qt MOOC系列教程》第五章第三节:创建新的QML类型_qmlregisteruncreatabletype-程序员宅基地
文章浏览阅读770次。到目前为止,我们已经讨论了如何将对象实例公开给QML上下文。有时我们还希望在QML中可以使用注册类本身。注册允许将类当作QML中的数据类型来使用。此外,注册还可以提供其他功能,比如允许在QML中将类用作可实例化的QML对象类型,或者允许在QML中导入和使用类的单例实例。通常我们使用Q_OBJECT宏注册从QObject派生的类,也可以用Q_GADGET宏声明一个比QObject“更轻”的版本。在这些更轻的类中,我们可以访问它们的属性、枚举和可调用的方法,但不能使用信号槽系统,我们稍后会进行介绍。1. 注_qmlregisteruncreatabletype
头文件与命名空间的关系_c#中命名空间和c语言中头文件之间的关系-程序员宅基地
文章浏览阅读2.1k次,点赞7次,收藏15次。头文件与命名空间的关系 Q:有些书说有些头文件不在std里是什么意思?std里包含些什么?为什么不用std就不能使用cout?头文件中声明的东西为什么在使用的时候需要先using namespace std;一下?如果我不用#include和其他头文件。只用using namespace std 的话,是不能用cout的。这说明cout是在iostream里声明_c#中命名空间和c语言中头文件之间的关系
随便推点
python实现矩阵乘法(实现文件读写操作)_python 读取csv矩阵乘法-程序员宅基地
文章浏览阅读1.2k次,点赞2次,收藏8次。注释dtype=np.int代表导入数据的格式为整数delimiter=’,'代表原始数据的存储格式为以‘,’为间隔原始文件中以‘#’开头的行代表被注释,不会被np.loadtxt读取通过[[0] * b for i in range(a)]的方式初始化一个x[a][b]的二维数组np.savetxt()函数可以用来保存数据,第一个参数为保存数据的路径,其中C是自定义的文件名,如果该文..._python 读取csv矩阵乘法
《军团要塞2》绘画渲染_军团要塞画师-程序员宅基地
文章浏览阅读1.4k次。军团要塞2绘画渲染(a)美术概念 (b)游戏内玩家看到的角色摘要在《军团要塞2》中我们提出了一整套美术方案和新的实时渲染技术,这种技术能实现出一种独一无二的渲染风格。《军团要塞2》由美术和程序基于20世纪初时商业插画中的传统风格合作完成。在这篇论文中,我们会结合美术方向与技术选择,来讨论如何支持美术目标和玩法限制。除了实现一种有冲击力的风格外,我们也设计了边缘光照和亮度与色调变化的着色器技..._军团要塞画师
【数字图像处理实验二】:RGB图3个通道的提取、RGB图转灰度图、图片反转、图片亮度调整、直方图显示_jupter rgb灰度直方图提取-程序员宅基地
文章浏览阅读9.6k次,点赞8次,收藏65次。这里介绍:RGB图3个通道的提取、RGB图转灰度图、图片反转、图片亮度调整具体操作,需导入的库如下:原图如下:结果如下,从左到右分别是:Red,Green,Blue这里借助skimage库中的exposure函数来进行图像亮度的调整结果如下:........._jupter rgb灰度直方图提取
2023年地级、省级、县级、国界、九段线的shp数据_九段线shp数据-程序员宅基地
文章浏览阅读931次。2023年地级、省级、县级、国界、九段线的shp数据_九段线shp数据
python高校本科生学习成长记录系统的设计与实现flask-django-php-nodejs-程序员宅基地
文章浏览阅读797次,点赞16次,收藏19次。二十一世纪我们的社会进入了信息时代,信息管理系统的建立,大大提高了人们信息化水平。传统的管理方式对时间、地点的限制太多,而在线管理系统刚好能满足这些需求,在线管理系统突破了传统管理方式的局限性。于是本文针对这一需求设计并实现了一个基于django高校本科生学习成长记录系统,为了简捷并有效的解决学习各方面的问题。
redis实现分布式session共享_redis分布式session共享-程序员宅基地
文章浏览阅读7.7k次。为什么要共享session?我们使用单台Tomcat的时候不会有共享sesssion的疑虑,只要使用Tomcat的默认配置即可,session即可存储在Tomcat上。但是随着业务的扩大,增加Tomcat节点构成Tomcat集群大势所趋,分布式带来了增加更大规模并发请求的优势,但是也随之到来了一个问题,每个Tomcat只存储来访问自己的请求产生的session,如果Tomcat-A已经为客..._redis分布式session共享