自定义WebGl打包模板【Unity 2021.3.2】_universal webgl template 1.3-程序员宅基地
目录
演示:
未修改: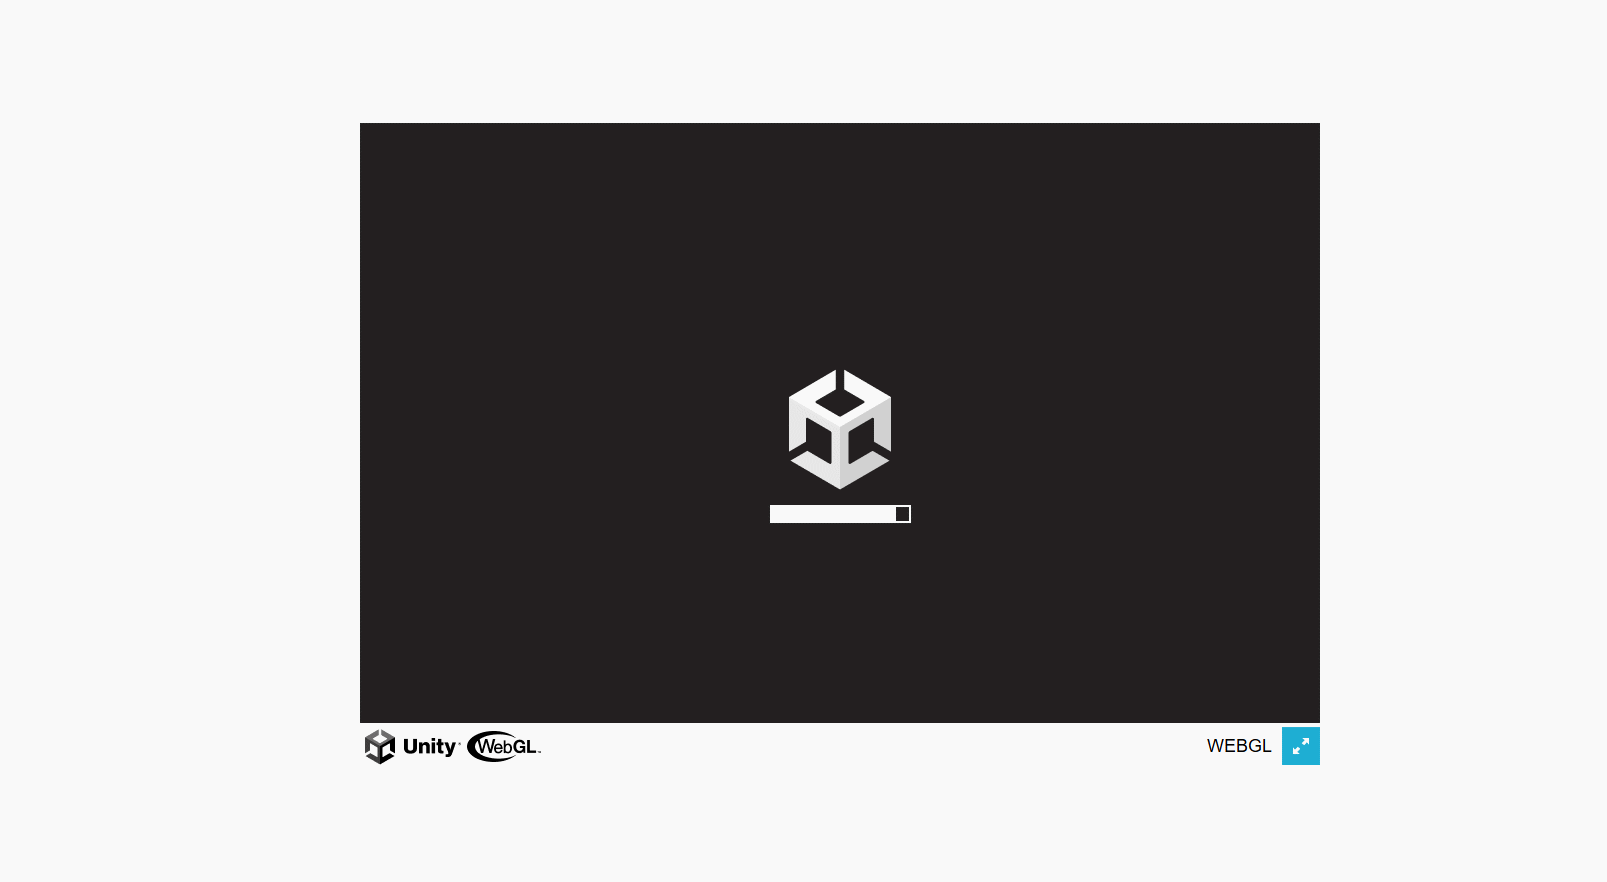
修改后: 
一、获取Unity 自带模板
1.路径:
Unity安装路径下\Editor\Data\PlaybackEngines\WebGLSupport\BuildTools\WebGLTemplates
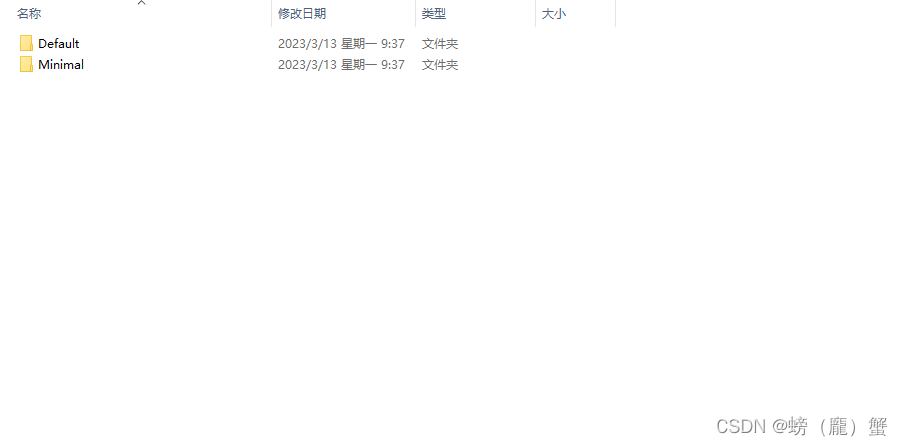
2.模板选择:
分别有 Default 和 Minimal 两个自带模板【Minimal 模板比较简洁什么都没有,这里选择Default,因为有进度条】
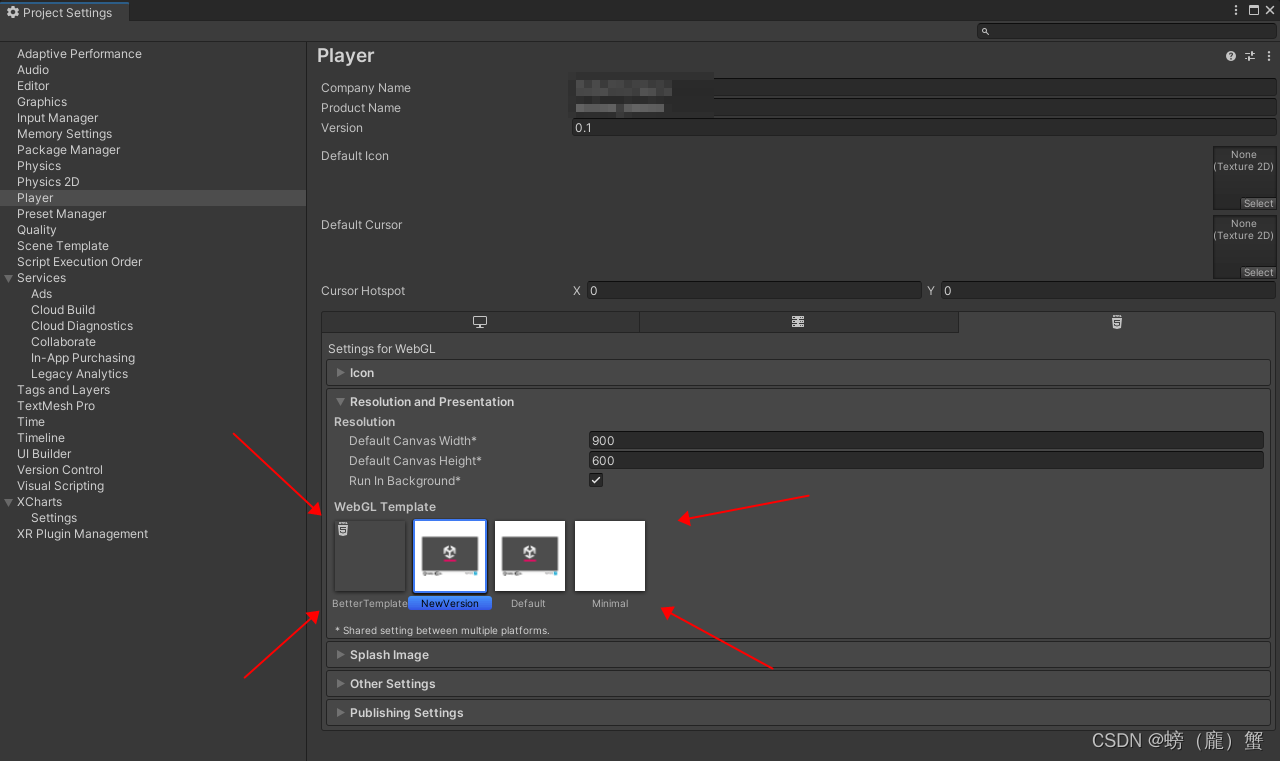
3.Unity 查看模板:
可以在 Project Settings -> Player -> Resolution add Presentation 查看 模板
二.导入Unity
1.创建模板
在 Unity Project 面板下创建 WebGLTemplates 文件夹【很重要】,在 WebGLTemplates 下创建的文件夹就是 在 Resolution add Presentation 下显示的名字【创建好后,就会出现模板】,红色箭头代表对应关系

2.模板文件说明:
TemplateData 文件夹:启动界面的进度条、图标等一些UI 。还有一个style.css文件【控制位置和一些图片引用】
-------------------------------------------------------------------------------------------------------------------------
index.html :为网页模板【很重要】
-------------------------------------------------------------------------------------------------------------------------
thumbnail.png:在Resolution add Presentation下显示的缩略图
三.修改模板
1.删除网页多余图片
HTML:
打开模板中 index.html 文件【下方为未修改的文件】
<!DOCTYPE html>
<html lang="en-us">
  <head>
    <meta charset="utf-8">
    <meta http-equiv="Content-Type" content="text/html; charset=utf-8">
    <title>Unity WebGL Player | {
   {
   { PRODUCT_NAME }}}</title>
    <link rel="shortcut icon" href="TemplateData/favicon.ico">
    <link rel="stylesheet" href="TemplateData/style.css">
  </head>
  <body>
    <div id="unity-container" class="unity-desktop">
      <canvas id="unity-canvas" width={
   {
   { WIDTH }}} height={
   {
   { HEIGHT }}}></canvas>
      <div id="unity-loading-bar">
        <div id="unity-logo"></div>
        <div id="unity-progress-bar-empty">
          <div id="unity-progress-bar-full"></div>
        </div>
      </div>
      <div id="unity-warning"> </div>
      <div id="unity-footer">
        <div id="unity-webgl-logo"></div>
        <div id="unity-fullscreen-button"></div>
        <div id="unity-build-title">{
   {
   { PRODUCT_NAME }}}</div>
      </div>
    </div>
    <script>
      var container = document.querySelector("#unity-container");
      var canvas = document.querySelector("#unity-canvas");
      var loadingBar = document.querySelector("#unity-loading-bar");
      var progressBarFull = document.querySelector("#unity-progress-bar-full");
      var fullscreenButton = document.querySelector("#unity-fullscreen-button");
      var warningBanner = document.querySelector("#unity-warning");

      // Shows a temporary message banner/ribbon for a few seconds, or
      // a permanent error message on top of the canvas if type=='error'.
      // If type=='warning', a yellow highlight color is used.
      // Modify or remove this function to customize the visually presented
      // way that non-critical warnings and error messages are presented to the
      // user.
      function unityShowBanner(msg, type) {
        function updateBannerVisibility() {
          warningBanner.style.display = warningBanner.children.length ? 'block' : 'none';
        }
        var div = document.createElement('div');
        div.innerHTML = msg;
        warningBanner.appendChild(div);
        if (type == 'error') div.style = 'background: red; padding: 10px;';
        else {
          if (type == 'warning') div.style = 'background: yellow; padding: 10px;';
          setTimeout(function() {
            warningBanner.removeChild(div);
            updateBannerVisibility();
          }, 5000);
        }
        updateBannerVisibility();
      }

      var buildUrl = "Build";
      var loaderUrl = buildUrl + "/{
   {
   { LOADER_FILENAME }}}";
      var config = {
        dataUrl: buildUrl + "/{
   {
   { DATA_FILENAME }}}",
        frameworkUrl: buildUrl + "/{
   {
   { FRAMEWORK_FILENAME }}}",
#if USE_WASM
        codeUrl: buildUrl + "/{
   {
   { CODE_FILENAME }}}",
#endif
#if MEMORY_FILENAME
        memoryUrl: buildUrl + "/{
   {
   { MEMORY_FILENAME }}}",
#endif
#if SYMBOLS_FILENAME
        symbolsUrl: buildUrl + "/{
   {
   { SYMBOLS_FILENAME }}}",
#endif
        streamingAssetsUrl: "StreamingAssets",
        companyName: {
   {
   { JSON.stringify(COMPANY_NAME) }}},
        productName: {
   {
   { JSON.stringify(PRODUCT_NAME) }}},
        productVersion: {
   {
   { JSON.stringify(PRODUCT_VERSION) }}},
        showBanner: unityShowBanner,
      };

      // By default Unity keeps WebGL canvas render target size matched with
      // the DOM size of the canvas element (scaled by window.devicePixelRatio)
      // Set this to false if you want to decouple this synchronization from
      // happening inside the engine, and you would instead like to size up
      // the canvas DOM size and WebGL render target sizes yourself.
      // config.matchWebGLToCanvasSize = false;

      if (/iPhone|iPad|iPod|Android/i.test(navigator.userAgent)) {
        // Mobile device style: fill the whole browser client area with the game canvas:

        var meta = document.createElement('meta');
        meta.name = 'viewport';
        meta.content = 'width=device-width, height=device-height, initial-scale=1.0, user-scalable=no, shrink-to-fit=yes';
        document.getElementsByTagName('head')[0].appendChild(meta);
        container.className = "unity-mobile";

        // To lower canvas resolution on mobile devices to gain some
        // performance, uncomment the following line:
        // config.devicePixelRatio = 1;

        canvas.style.width = window.innerWidth + 'px';
        canvas.style.height = window.innerHeight + 'px';

        unityShowBanner('WebGL builds are not supported on mobile devices.');
      } else {
        // Desktop style: Render the game canvas in a window that can be maximized to fullscreen:

        canvas.style.width = "{
   {
   { WIDTH }}}px";
        canvas.style.height = "{
   {
   { HEIGHT }}}px";
      }

#if BACKGROUND_FILENAME
      canvas.style.background = "url('" + buildUrl + "/{
   {
   { BACKGROUND_FILENAME.replace(/'/g, '%27') }}}') center / cover";
#endif
      loadingBar.style.display = "block";

      var script = document.createElement("script");
      script.src = loaderUrl;
      script.onload = () => {
        createUnityInstance(canvas, config, (progress) => {
          progressBarFull.style.width = 100 * progress + "%";
        }).then((unityInstance) => {
          loadingBar.style.display = "none";
          fullscreenButton.onclick = () => {
            unityInstance.SetFullscreen(1);
          };
        }).catch((message) => {
          alert(message);
        });
      };
      document.body.appendChild(script);
    </script>
  </body>
</html>
【删除第 31、23 行 代码】:
第31行,这里引用了CSS里面的图片样式,最后会直接显示在打包好的WebGl程序中。【下方为需要删除的代码,全屏的按钮】
【注】在当前脚本中会有这些代码的引用记得删掉【按钮的绑定事件】
-------------------------------------------------------------------------------------------------------------------------
第23行,会获取 Unity 里的 Product Name 显示在打包程序上,所以删掉
  31行  -    var fullscreenButton = document.querySelector("#unity-fullscreen-button");
  23行  -    <div id="unity-build-title">{
   {
   { PRODUCT_NAME }}}</div>
CSS:
CSS文件在 TemplateData 文件夹下【下方为原代码】
body { padding: 0; margin: 0 }
#unity-container { position: absolute }
#unity-container.unity-desktop { left: 50%; top: 50%; transform: translate(-50%, -50%) }
#unity-container.unity-mobile { width: 100%; height: 100% }
#unity-canvas { background: {
   {
   { BACKGROUND_COLOR }}} }
.unity-mobile #unity-canvas { width: 100%; height: 100% }
#unity-loading-bar { position: absolute; left: 50%; top: 50%; transform: translate(-50%, -50%); display: none }
#unity-logo { width: 154px; height: 130px; background: url('unity-logo-{
   {
   { SPLASH_SCREEN_STYLE.toLowerCase() }}}.png') no-repeat center }
#unity-progress-bar-empty { width: 141px; height: 18px; margin-top: 10px; margin-left: 6.5px; background: url('progress-bar-empty-{
   {
   { SPLASH_SCREEN_STYLE.toLowerCase() }}}.png') no-repeat center }
#unity-progress-bar-full { width: 0%; height: 18px; margin-top: 10px; background: url('progress-bar-full-{
   {
   { SPLASH_SCREEN_STYLE.toLowerCase() }}}.png') no-repeat center }
#unity-footer { position: relative }
.unity-mobile #unity-footer { display: none }
#unity-webgl-logo { float:left; width: 204px; height: 38px; background: url('webgl-logo.png') no-repeat center }
#unity-build-title { float: right; margin-right: 10px; line-height: 38px; font-family: arial; font-size: 18px }
#unity-fullscreen-button { float: right; width: 38px; height: 38px; background: url('fullscreen-button.png') no-repeat center }
#unity-warning { position: absolute; left: 50%; top: 5%; transform: translate(-50%); background: white; padding: 10px; display: none }
删除掉 第 8、13、14、15行代码 【刚刚在后缀 HTML,脚本里删掉了全屏的按钮,这里的引用也就没有用了,所以删掉【第15行】 】
剩下的就是一些显示的Logo 和 图片什么的【所以也删掉,不然会影响全屏,比如打包后会出现滑动条】
2.全屏、适配浏览器大小:
在未修改文件的第 106 - 107 行:【vh、vw 在HTML里代表视口】注意位置别找错
 canvas.style.width = "{
   {
   { WIDTH }}}px";
 canvas.style.height = "{
   {
   { HEIGHT }}}px";
修改为:
canvas.style.width = "100vw";
canvas.style.height = "98vh";
四、进度条:
经过上面修改打包出来的效果如下:

打开 TemplateData 文件夹: 图片只保留 【progress-bar-empty-dark】和【progress-bar-full-dark】进度条,剩下图片都不需要【注】这里删的都是图片
-------------------------------------------------------------------------------------------------------------------------
图片我做了修改【黑色图上面有一张白色图】


CSS:
这里只修改
#unity-progress-bar-empty { width: 141px; height: 18px; margin-top: 10px; margin-left: 6.5px; background: url('progress-bar-empty-{
   {
   { SPLASH_SCREEN_STYLE.toLowerCase() }}}.png') no-repeat center }
#unity-progress-bar-full { width: 0%; height: 18px; margin-top: 10px; background: url('progress-bar-full-{
   {
   { SPLASH_SCREEN_STYLE.toLowerCase() }}}.png') no-repeat center }
修改为:
#unity-progress-bar-empty { width: 564px; height: 18px; margin-top: 500px; margin-left: 6.5px; background: url('progress-bar-empty-{
   {
   { SPLASH_SCREEN_STYLE.toLowerCase() }}}.png') no-repeat  }
#unity-progress-bar-full { width: 0%; height: 18px; margin-top: 502px; background: url('progress-bar-full-{
   {
   { SPLASH_SCREEN_STYLE.toLowerCase() }}}.png') no-repeat  }
unity-progress-bar-empty:为底图
unity-progress-bar-full :进度条
-------------------------------------------------------------------------------------------------------------------------
将底图的 Width 修改为 564px【制作的地图宽】margin-top 修改为500px【将进度条放在下方】,将最后的 center 删掉
进度条 的 margin-top 修改为500px【因为修改的图片关系】,代码最后面的 center 也删掉
五、完成

但是发现进度条没有走完
HTML:
未修改:
第 9、10行代表给滑动条赋值。
第 13 行代表 进度条消失
#if BACKGROUND_FILENAME
      canvas.style.background = "url('" + buildUrl + "/{
   {
   { BACKGROUND_FILENAME.replace(/'/g, '%27') }}}') center / cover";
#endif
      loadingBar.style.display = "block";

      var script = document.createElement("script");
      script.src = loaderUrl;
      script.onload = () => {
        createUnityInstance(canvas, config, (progress) => {
            progressBarFull.style.width = 100 * progress + "%";

        }).then((unityInstance) => {
          loadingBar.style.display = "none";

        }).catch((message) => {
          alert(message);
        });
      };
      document.body.appendChild(script);
修改后:
在第 13 行 添加 Html 代码 【500代表 0.5秒后执行】
setTimeout(function ()
{
   loadingBar.style.display = "none";
}, 500);
注意第 12 - 14 行
#if BACKGROUND_FILENAME
      canvas.style.background = "url('" + buildUrl + "/{
   {
   { BACKGROUND_FILENAME.replace(/'/g, '%27') }}}') center / cover";
#endif
      loadingBar.style.display = "block";

      var script = document.createElement("script");
      script.src = loaderUrl;
      script.onload = () => {
        createUnityInstance(canvas, config, (progress) => {
          progressBarFull.style.width = 100 * progress + "%";
        }).then((unityInstance) => {
            setTimeout(function () {
                loadingBar.style.display = "none";
            }, 500);
        }).catch((message) => {
          alert(message);
        });
      };
      document.body.appendChild(script);
智能推荐
工作中如何编译开源工具(gdb)_gdb编译-程序员宅基地
文章浏览阅读2.5k次,点赞2次,收藏15次。编译是大部分工程师的烦恼,大家普遍喜欢去写业务代码。但我觉得基本的编译流程,我们还是需要掌握的,希望遇到相关问题,不要退缩,尝试去解决。天下文章一大抄,百度能解决我们90%的问题。_gdb编译
python简易爬虫v1.0-程序员宅基地
文章浏览阅读1.8k次,点赞4次,收藏6次。python简易爬虫v1.0作者:William Ma (the_CoderWM)进阶python的首秀,大部分童鞋肯定是做个简单的爬虫吧,众所周知,爬虫需要各种各样的第三方库,例如scrapy, bs4, requests, urllib3等等。此处,我们先从最简单的爬虫开始。首先,我们需要安装两个第三方库:requests和bs4。在cmd中输入以下代码:pip install requestspip install bs4等安装成功后,就可以进入pycharm来写爬虫了。爬
安装flask后vim出现:error detected while processing /home/zww/.vim/ftplugin/python/pyflakes.vim:line 28_freetorn.vim-程序员宅基地
文章浏览阅读2.6k次。解决方法:解决方法可以去github重新下载一个pyflakes.vim。执行如下命令git clone --recursive git://github.com/kevinw/pyflakes-vim.git然后进入git克降目录,./pyflakes-vim/ftplugin,通过如下命令将python目录下的所有文件复制到~/.vim/ftplugin目录下即可。cp -R ...._freetorn.vim
HIT CSAPP大作业:程序人生—Hello‘s P2P-程序员宅基地
文章浏览阅读210次,点赞7次,收藏3次。本文简述了hello.c源程序的预处理、编译、汇编、链接和运行的主要过程,以及hello程序的进程管理、存储管理与I/O管理,通过hello.c这一程序周期的描述,对程序的编译、加载、运行有了初步的了解。_hit csapp
18个顶级人工智能平台-程序员宅基地
文章浏览阅读1w次,点赞2次,收藏27次。来源:机器人小妹 很多时候企业拥有重复,乏味且困难的工作流程,这些流程往往会减慢生产速度并增加运营成本。为了降低生产成本,企业别无选择,只能自动化某些功能以降低生产成本。 通过数字化..._人工智能平台
electron热加载_electron-reloader-程序员宅基地
文章浏览阅读2.2k次。热加载能够在每次保存修改的代码后自动刷新 electron 应用界面,而不必每次去手动操作重新运行,这极大的提升了开发效率。安装 electron 热加载插件热加载虽然很方便,但是不是每个 electron 项目必须的,所以想要舒服的开发 electron 就只能给 electron 项目单独的安装热加载插件[electron-reloader]:// 在项目的根目录下安装 electron-reloader,国内建议使用 cnpm 代替 npmnpm install electron-relo._electron-reloader
随便推点
精选了20个Python实战项目(附源码),拿走就用!-程序员宅基地
文章浏览阅读3.8w次,点赞107次,收藏993次。点击上方“Python爬虫与数据挖掘”,进行关注回复“书籍”即可获赠Python从入门到进阶共10本电子书今日鸡汤昔闻洞庭水,今上岳阳楼。大家好,我是小F。Python是目前最好的编程语言之一。由于其可读性和对初学者的友好性,已被广泛使用。那么要想学会并掌握Python,可以实战的练习项目是必不可少的。接下来,我将给大家介绍20个非常实用的Python项目,帮助大家更好的..._python项目
android在线图标生成工具,图标在线生成工具Android Asset Studio的使用-程序员宅基地
文章浏览阅读1.3k次。在网站的导航资源里看到了一个非常好用的东西:Android Asset Studio,可以在线生成各种图标。之前一直在用一个叫做Android Icon Creator的插件,可以直接在Android Studio的插件里搜索,这个工具的优点是可以生成适应各种分辨率的一套图标,有好几种风格的图标资源,遗憾的是虽然有很多套图标风格,毕竟是有限的。Android Asset Studio可以自己选择其..._在线 android 图标
android 无限轮播的广告位_轮播广告位-程序员宅基地
文章浏览阅读514次。无限轮播广告位没有录屏,将就将就着看,效果就是这样主要代码KsBanner.java/** * 广告位 * * Created by on 2016/12/20. */public class KsBanner extends FrameLayout implements ViewPager.OnPageChangeListener { private List
echart省会流向图(物流运输、地图)_java+echart地图+物流跟踪-程序员宅基地
文章浏览阅读2.2k次,点赞2次,收藏6次。继续上次的echart博客,由于省会流向图是从echart画廊中直接取来的。所以直接上代码<!DOCTYPE html><html><head> <meta charset="utf-8" /> <meta name="viewport" content="width=device-width,initial-scale=1,minimum-scale=1,maximum-scale=1,user-scalable=no" /&_java+echart地图+物流跟踪
Ceph源码解析:读写流程_ceph 发送数据到其他副本的源码-程序员宅基地
文章浏览阅读1.4k次。一、OSD模块简介1.1 消息封装:在OSD上发送和接收信息。cluster_messenger -与其它OSDs和monitors沟通client_messenger -与客户端沟通1.2 消息调度:Dispatcher类,主要负责消息分类1.3 工作队列:1.3.1 OpWQ: 处理ops(从客户端)和sub ops(从其他的OSD)。运行在op_tp线程池。1...._ceph 发送数据到其他副本的源码
进程调度(一)——FIFO算法_进程调度fifo算法代码-程序员宅基地
文章浏览阅读7.9k次,点赞3次,收藏22次。一 定义这是最早出现的置换算法。该算法总是淘汰最先进入内存的页面,即选择在内存中驻留时间最久的页面予以淘汰。该算法实现简单,只需把一个进程已调入内存的页面,按先后次序链接成一个队列,并设置一个指针,称为替换指针,使它总是指向最老的页面。但该算法与进程实际运行的规律不相适应,因为在进程中,有些页面经常被访问,比如,含有全局变量、常用函数、例程等的页面,FIFO 算法并不能保证这些页面不被淘汰。这里,我_进程调度fifo算法代码