移动开发技术:APP门户页面设计与开发_移动门户系统设计-程序员宅基地
技术标签: java android studio
一:目标
设计一个app的门户框架,需要实现3-4个tab切换效果
在任一tab页中实现列表效果
二:技术说明
目标一需要的技术为:Activity、Xml、Fragment
Activity:Activity类是Android应用的关键组件,而Activity的启动和组合方式则是该平台应用模型的基本组成部分。在编程范式中,应用是通过main()方法启动的,而Android系统与此不同,它会调用与其生命周期特定阶段相对应的特定回调方法来启动Activity实例中的代码。
Xml:安卓开发中Xml文件和Java文件是一同存在的。我们可以把Java理解为创建对象和定义对象的方法,而Xml文件则是和使用者的可视化交互(即UI界面)。Xml包括了以下的交互功能:动画视频、图片(透明度、大小、位置)、布局、按钮、文字显示、主题、菜单等。
Fragment:Fragment是一种可以嵌入在Activity当中的UI片段,用来组建Activity界面的局部模块, 也可以说一个Actiivty界面可以由多个Fragment组成,其行为与Activity很相似,,有自己对应的布局(包含具体的View),,它有自己的生命周期,接收自己的输入事件,并且可以从运行中的activity中添加或移除
目标二需要使用Recycleview
Recycleview:RecycleView是Android开发中的一个视图组件,用于展示大量数据集合的列表或网格。它是ListView的升级版本,提供了更好的性能和灵活性。
三:代码解析
界面设计

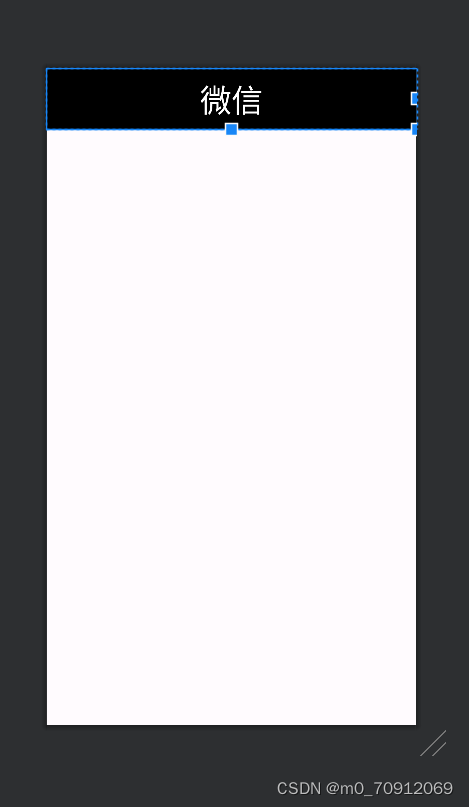
主界面分为上中下三个部分,底部由4个tab页面组成,用4个fragment.xml以实现不同页面的切换。头部用top.xml一个文件完成对上方页面的设计,最后用一个activity_main.xml完成对各个布局文件的整合
top.xml
用 android:text设置文本内容,用 android:textColor设置文本颜色,android:gravity用来设置view中的内容相对于view本身的对齐方式,调整好文本区域和字体大小即可,代码如下
<?xml version="1.0" encoding="utf-8"?>
<LinearLayout xmlns:android="http://schemas.android.com/apk/res/android"
android:layout_width="match_parent"
android:layout_height="match_parent">
<TextView
android:id="@+id/textView"
android:layout_width="0dp"
android:layout_height="68dp"
android:layout_weight="1"
android:gravity="center"
android:shadowColor="#FFFFFF"
android:text="微信"
android:background="@color/black"
android:textColor="@color/white"
android:textSize="35dp" />
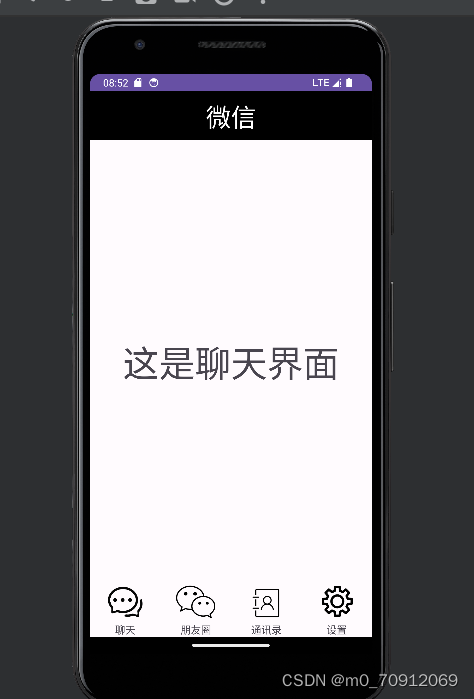
</LinearLayout>预览效果
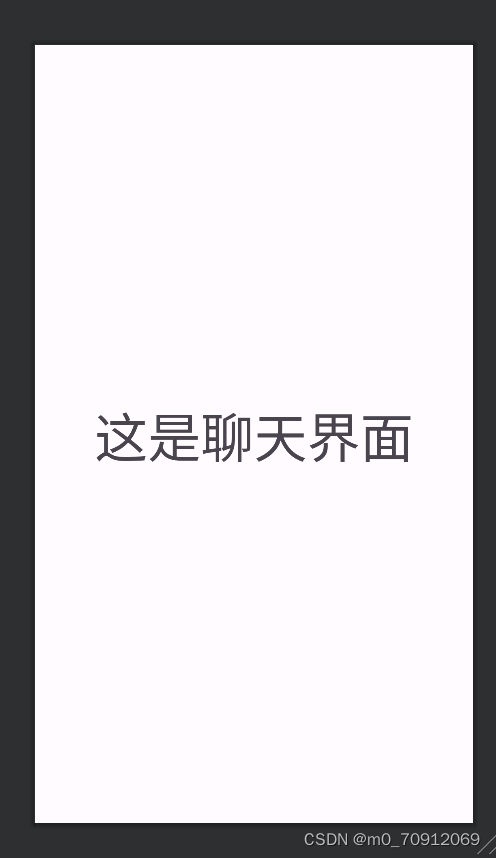
fragment.xml
其他页面与本页面类似,代码也类似
<?xml version="1.0" encoding="utf-8"?>
<FrameLayout xmlns:android="http://schemas.android.com/apk/res/android"
    xmlns:tools="http://schemas.android.com/tools"
    android:layout_width="match_parent"
    android:layout_height="match_parent"
    tools:context=".Fragment1">

    <!-- TODO: Update blank fragment layout -->
    <TextView
        android:id="@+id/textView2"
        android:layout_width="wrap_content"
        android:layout_height="wrap_content"
        android:layout_weight="1"
        android:layout_gravity="center"
        android:gravity="center"
        android:textSize="50dp"
        android:text="这是聊天界面" />

</FrameLayout>
预览效果
选定一个页面实现列表效果
重新设计其中一个fragment.xml文件
<?xml version="1.0" encoding="utf-8"?>
<LinearLayout xmlns:android="http://schemas.android.com/apk/res/android"
    xmlns:app="http://schemas.android.com/apk/res-auto"
    android:layout_width="match_parent"
    android:layout_height="match_parent">

    <androidx.recyclerview.widget.RecyclerView
        android:id="@+id/recycleView"
        android:layout_width="match_parent"
        android:layout_height="match_parent"
        app:layout_constraintBottom_toTopOf="parent"
        app:layout_constraintEnd_toStartOf="parent"
        app:layout_constraintStart_toEndOf="parent"
        app:layout_constraintTop_toBottomOf="parent"
        app:layout_constraintVertical_bias="0.489"
        />
</LinearLayout>
预览效果

新建一个item.xml用于设计此页面布局格式
<?xml version="1.0" encoding="utf-8"?>
<LinearLayout xmlns:android="http://schemas.android.com/apk/res/android"
    android:layout_width="match_parent"
    android:layout_height="wrap_content">

    <TextView
        android:id="@+id/textView44"
        android:layout_width="match_parent"
        android:layout_height="match_parent"
        android:layout_weight="1"
        android:gravity="center"
        android:text="TextView"
        android:textColor="@color/black"
        android:textSize="20sp" />
</LinearLayout>
bottom.xml
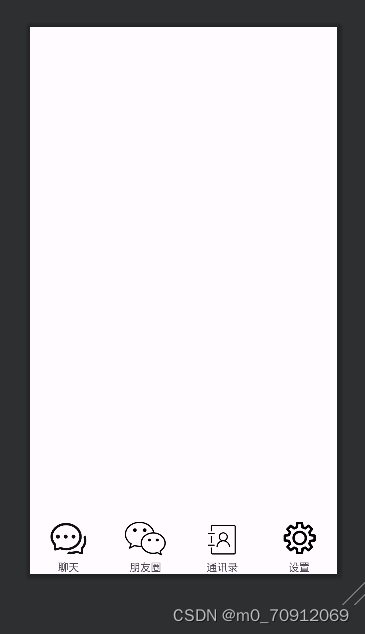
用bottom.xml设计底部按钮栏,将需要的图片复制到drawble文件下

<?xml version="1.0" encoding="utf-8"?>
<LinearLayout xmlns:android="http://schemas.android.com/apk/res/android"
    android:layout_width="match_parent"
    android:layout_height="wrap_content"
    android:layout_gravity="bottom"
    android:orientation="horizontal">

    <LinearLayout
        android:id="@+id/layout1"
        android:layout_width="wrap_content"
        android:layout_height="match_parent"
        android:layout_weight="1"
        android:gravity="center"
        android:orientation="vertical">

        <ImageView
            android:id="@+id/imageView3"
            android:layout_width="match_parent"
            android:layout_height="55dp"
            android:src="@drawable/bottom_1" />

        <TextView
            android:id="@+id/textView33"
            android:layout_width="match_parent"
            android:layout_height="wrap_content"
            android:gravity="center"
            android:text="聊天" />

    </LinearLayout>

    <LinearLayout
        android:id="@+id/layout2"
        android:layout_width="wrap_content"
        android:layout_height="match_parent"
        android:layout_weight="1"
        android:gravity="center"
        android:orientation="vertical">

        <ImageView
            android:id="@+id/imageView1"
            android:layout_width="match_parent"
            android:layout_height="55dp"
            android:src="@drawable/bottom_3" />

        <TextView
            android:id="@+id/textView11"
            android:layout_width="match_parent"
            android:layout_height="wrap_content"
            android:gravity="center"
            android:text="朋友圈" />

    </LinearLayout>

    <LinearLayout
        android:id="@+id/layout3"
        android:layout_width="wrap_content"
        android:layout_height="wrap_content"
        android:layout_weight="1"
        android:gravity="center"
        android:orientation="vertical">

        <ImageView
            android:id="@+id/imageView2"
            android:layout_width="match_parent"
            android:layout_height="55dp"
            android:src="@drawable/bottom_2" />

        <TextView
            android:id="@+id/textView22"
            android:layout_width="match_parent"
            android:layout_height="wrap_content"
            android:gravity="center"
            android:text="通讯录" />

    </LinearLayout>


    <LinearLayout
        android:id="@+id/layout4"
        android:layout_width="wrap_content"
        android:layout_height="wrap_content"
        android:layout_weight="1"
        android:gravity="center"
        android:orientation="vertical">

        <ImageView
            android:id="@+id/imageView4"
            android:layout_width="match_parent"
            android:layout_height="55dp"
            android:src="@drawable/bottom_4" />

        <TextView
            android:id="@+id/textView44"
            android:layout_width="match_parent"
            android:layout_height="wrap_content"
            android:gravity="center"
            android:text="设置" />

    </LinearLayout>

</LinearLayout>
用imageview设计导入图片的格式,其中用 android:src="@drawable/bottom_4"导入需要用到的图片
预览效果
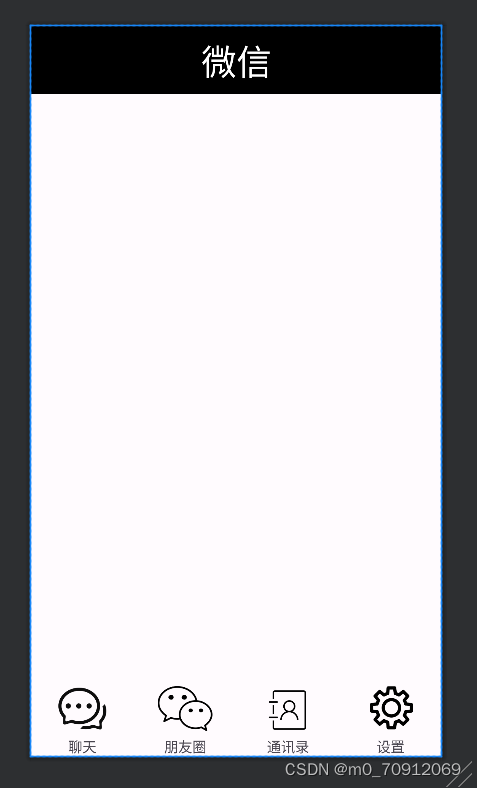
activity_main.xml
其他页面设计好后再用一个xml文件将其他页面整合,用一个content将top和bottom放入上方和下方
<?xml version="1.0" encoding="utf-8"?>
<LinearLayout xmlns:android="http://schemas.android.com/apk/res/android"
    xmlns:app="http://schemas.android.com/apk/res-auto"
    xmlns:tools="http://schemas.android.com/tools"
    android:layout_width="match_parent"
    android:layout_height="match_parent"
    android:orientation="vertical"
    tools:context=".MainActivity">


    <include
        layout="@layout/top"
        android:layout_width="match_parent"
        android:layout_height="wrap_content" />

    <FrameLayout
        android:id="@+id/content"
        android:layout_width="wrap_content"
        android:layout_height="match_parent"
        android:layout_gravity="center"
        android:layout_weight="3" />

    <include
        layout="@layout/bottom"
        android:layout_width="match_parent"
        android:layout_height="wrap_content" />
</LinearLayout>
预览效果
java文件
首先用四个fragment文件分别连接对应的fragment.xml文件
各个文件代码类似
package com.example.myapplication;

import android.os.Bundle;

import androidx.fragment.app.Fragment;

import android.view.LayoutInflater;
import android.view.View;
import android.view.ViewGroup;

public class Fragment1 extends Fragment {

    public View onCreateView(LayoutInflater inflater, ViewGroup container,
                             Bundle savedInstanceState) {
        // Inflate the layout for this fragment
        return inflater.inflate(R.layout.fragment_blank1, container, false);
    }
}
修改其中一个fragment
package com.example.myapplication;
import android.annotation.SuppressLint;
import android.content.Context;
import android.os.Bundle;
import android.view.LayoutInflater;
import android.view.View;
import android.view.ViewGroup;
import androidx.fragment.app.Fragment;
import androidx.recyclerview.widget.LinearLayoutManager;
import androidx.recyclerview.widget.RecyclerView;
import java.util.*;
public class Fragment2 extends Fragment {
Context context;
List list;
RecyclerView recyclerView;
Myadapter myadapter;
@SuppressLint("MissingInflatedId")
@Override
public View onCreateView(LayoutInflater inflater, ViewGroup container,Bundle savedInstanceState) {
View view = inflater.inflate(R.layout.fragment_blank2, container, false);
context = view.getContext();
recyclerView = view.findViewById(R.id.recycleView);
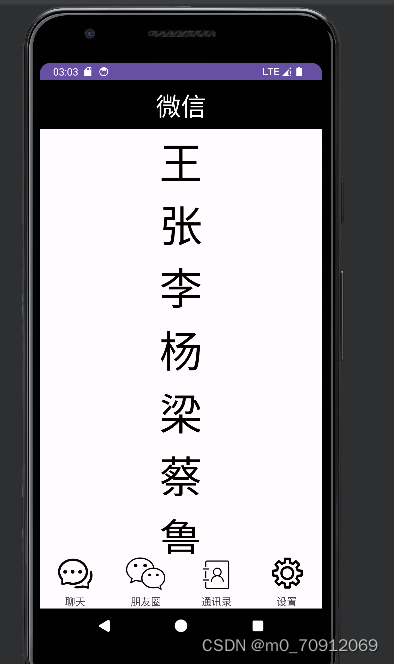
List<String> contacts = new ArrayList<>();
contacts.add("王");
contacts.add("张");
contacts.add("李");
contacts.add("杨");
contacts.add("梁");
contacts.add("蔡");
contacts.add("鲁");
contacts.add("蒋");
contacts.add("富");
contacts.add("陈");
contacts.add("刘");
Myadapter myadapter = new Myadapter(contacts, getContext());
recyclerView.setAdapter(myadapter);
LinearLayoutManager manager = new LinearLayoutManager(context);
manager.setOrientation(LinearLayoutManager.VERTICAL);
recyclerView.setLayoutManager(manager);
return view;
}
}通过findViewById找到对应的recycleview组件,通过list创建一个对象,将需要的东西存储在其中,再创建一个myadapter对象将数据传给适配器
Myadapter
package com.example.myapplication;

import android.content.Context;
import android.view.LayoutInflater;
import android.view.View;
import android.view.ViewGroup;
import android.widget.TextView;

import androidx.annotation.NonNull;
import androidx.recyclerview.widget.RecyclerView;

import java.util.List;
import java.util.zip.Inflater;

public class Myadapter extends RecyclerView.Adapter<Myadapter.Myholder> {
    List<String> list1;
    Context context1;

    public Myadapter(List list, Context context){
        context1=context;
        list1=list;
    }
    @NonNull
    @Override
    public Myholder onCreateViewHolder(@NonNull ViewGroup parent, int viewType) {
        View view=LayoutInflater.from(context1).inflate(R.layout.item,parent,false);
        Myholder myholder=new Myholder(view);
        return myholder;
    }


    @Override
    public void onBindViewHolder(@NonNull Myholder holder, int position) {
        holder.textView.setText(list1.get(position));

    }

    @Override
    public int getItemCount() {
        return list1.size();

    }
    class Myholder extends RecyclerView.ViewHolder{
        TextView textView;

        public Myholder(@NonNull View itemView) {
            super(itemView);
            textView=itemView.findViewById(R.id.textView44);
        }
    }
}
onCreateViewHolder(),用于连接到item.xml文件。再通过list1获取到应该显示的数据,以便将数据正常显示出来
MainActivity
package com.example.myapplication;

import androidx.appcompat.app.AppCompatActivity;
import androidx.fragment.app.Fragment;
import androidx.fragment.app.FragmentManager;
import androidx.fragment.app.FragmentTransaction;

import android.os.Bundle;
import android.view.View;
import android.widget.LinearLayout;

public class MainActivity extends AppCompatActivity implements View.OnClickListener {
    Fragment1 fragment;
    FragmentManager fm;
    FragmentTransaction ft;
    Fragment fragment1, fragment2, fragment3, fragment4;
    LinearLayout linearLayout1, linearLayout2, linearLayout3, linearLayout4;

    @Override
    protected void onCreate(Bundle savedInstanceState) {
        super.onCreate(savedInstanceState);
        setContentView(R.layout.activity_main1);
        linearLayout1 = findViewById(R.id.layout2);
        linearLayout2 = findViewById(R.id.layout3);
        linearLayout3 = findViewById(R.id.layout1);
        linearLayout4 = findViewById(R.id.layout4);
        fm = getSupportFragmentManager();
        fragment1 = new Fragment1();
        fragment2 = new Fragment2();
        fragment3 = new Fragment3();
        fragment4 = new Fragment4();
        innitial();
        fragmentshow(fragment1);
        ft = fm.beginTransaction();
        linearLayout1.setOnClickListener(this);
        linearLayout2.setOnClickListener(this);
        linearLayout3.setOnClickListener(this);
        linearLayout4.setOnClickListener(this);

    }

    private void fragmenthide() {
        ft = fm.beginTransaction()
                .hide(fragment1)
                .hide(fragment2)
                .hide(fragment3)
                .hide(fragment4);
        ft.commit();
    }

    private void fragmentshow(Fragment fragment) {
        fragmenthide();
        ft = fm.beginTransaction()
                .show(fragment);
        ft.commit();
    }

    private void innitial() {
        FragmentTransaction ft = fm.beginTransaction()
                .add(R.id.content, fragment1)
                .add(R.id.content, fragment2)
                .add(R.id.content, fragment3)
                .add(R.id.content, fragment4);
        ft.commit();
    }
    @Override
    public void onClick(View view) {
        fragmenthide();
        if (view.getId() == R.id.layout2) {
            fragmenthide();
            fragmentshow(fragment1);
        }
        if (view.getId() == R.id.layout3) {
            fragmenthide();
            fragmentshow(fragment2);
        }
        if (view.getId() == R.id.layout1) {
            fragmenthide();
            fragmentshow(fragment3);
        }
        if (view.getId() == R.id.layout4) {
            fragmenthide();
            fragmentshow(fragment4);
        }

    }
}
其中编写了fragmentshow和fragmenthide函数用于各个页面的打开和隐藏,再编写onclick函数,用getId连接对应的页面,使点击时能出现对应页面
最终效果
智能推荐
hive使用适用场景_大数据入门:Hive应用场景-程序员宅基地
文章浏览阅读5.8k次。在大数据的发展当中,大数据技术生态的组件,也在不断地拓展开来,而其中的Hive组件,作为Hadoop的数据仓库工具,可以实现对Hadoop集群当中的大规模数据进行相应的数据处理。今天我们的大数据入门分享,就主要来讲讲,Hive应用场景。关于Hive,首先需要明确的一点就是,Hive并非数据库,Hive所提供的数据存储、查询和分析功能,本质上来说,并非传统数据库所提供的存储、查询、分析功能。Hive..._hive应用场景
zblog采集-织梦全自动采集插件-织梦免费采集插件_zblog 网页采集插件-程序员宅基地
文章浏览阅读496次。Zblog是由Zblog开发团队开发的一款小巧而强大的基于Asp和PHP平台的开源程序,但是插件市场上的Zblog采集插件,没有一款能打的,要么就是没有SEO文章内容处理,要么就是功能单一。很少有适合SEO站长的Zblog采集。人们都知道Zblog采集接口都是对Zblog采集不熟悉的人做的,很多人采取模拟登陆的方法进行发布文章,也有很多人直接操作数据库发布文章,然而这些都或多或少的产生各种问题,发布速度慢、文章内容未经严格过滤,导致安全性问题、不能发Tag、不能自动创建分类等。但是使用Zblog采._zblog 网页采集插件
Flink学习四:提交Flink运行job_flink定时运行job-程序员宅基地
文章浏览阅读2.4k次,点赞2次,收藏2次。restUI页面提交1.1 添加上传jar包1.2 提交任务job1.3 查看提交的任务2. 命令行提交./flink-1.9.3/bin/flink run -c com.qu.wc.StreamWordCount -p 2 FlinkTutorial-1.0-SNAPSHOT.jar3. 命令行查看正在运行的job./flink-1.9.3/bin/flink list4. 命令行查看所有job./flink-1.9.3/bin/flink list --all._flink定时运行job
STM32-LED闪烁项目总结_嵌入式stm32闪烁led实验总结-程序员宅基地
文章浏览阅读1k次,点赞2次,收藏6次。这个项目是基于STM32的LED闪烁项目,主要目的是让学习者熟悉STM32的基本操作和编程方法。在这个项目中,我们将使用STM32作为控制器,通过对GPIO口的控制实现LED灯的闪烁。这个STM32 LED闪烁的项目是一个非常简单的入门项目,但它可以帮助学习者熟悉STM32的编程方法和GPIO口的使用。在这个项目中,我们通过对GPIO口的控制实现了LED灯的闪烁。LED闪烁是STM32入门课程的基础操作之一,它旨在教学生如何使用STM32开发板控制LED灯的闪烁。_嵌入式stm32闪烁led实验总结
Debezium安装部署和将服务托管到systemctl-程序员宅基地
文章浏览阅读63次。本文介绍了安装和部署Debezium的详细步骤,并演示了如何将Debezium服务托管到systemctl以进行方便的管理。本文将详细介绍如何安装和部署Debezium,并将其服务托管到systemctl。解压缩后,将得到一个名为"debezium"的目录,其中包含Debezium的二进制文件和其他必要的资源。注意替换"ExecStart"中的"/path/to/debezium"为实际的Debezium目录路径。接下来,需要下载Debezium的压缩包,并将其解压到所需的目录。
Android 控制屏幕唤醒常亮或熄灭_android实现拿起手机亮屏-程序员宅基地
文章浏览阅读4.4k次。需求:在诗词曲文项目中,诗词整篇朗读的时候,文章没有读完会因为屏幕熄灭停止朗读。要求:在文章没有朗读完毕之前屏幕常亮,读完以后屏幕常亮关闭;1.权限配置:设置电源管理的权限。
随便推点
目标检测简介-程序员宅基地
文章浏览阅读2.3k次。目标检测简介、评估标准、经典算法_目标检测
记SQL server安装后无法连接127.0.0.1解决方法_sqlserver 127 0 01 无法连接-程序员宅基地
文章浏览阅读6.3k次,点赞4次,收藏9次。实训时需要安装SQL server2008 R所以我上网上找了一个.exe 的安装包链接:https://pan.baidu.com/s/1_FkhB8XJy3Js_rFADhdtmA提取码:ztki注:解压后1.04G安装时Microsoft需下载.NET,更新安装后会自动安装如下:点击第一个傻瓜式安装,唯一注意的是在修改路径的时候如下不可修改:到安装实例的时候就可以修改啦数据..._sqlserver 127 0 01 无法连接
js 获取对象的所有key值,用来遍历_js 遍历对象的key-程序员宅基地
文章浏览阅读7.4k次。1. Object.keys(item); 获取到了key之后就可以遍历的时候直接使用这个进行遍历所有的key跟valuevar infoItem={ name:'xiaowu', age:'18',}//的出来的keys就是[name,age]var keys=Object.keys(infoItem);2. 通常用于以下实力中 <div *ngFor="let item of keys"> <div>{{item}}.._js 遍历对象的key
粒子群算法(PSO)求解路径规划_粒子群算法路径规划-程序员宅基地
文章浏览阅读2.2w次,点赞51次,收藏310次。粒子群算法求解路径规划路径规划问题描述 给定环境信息,如果该环境内有障碍物,寻求起始点到目标点的最短路径, 并且路径不能与障碍物相交,如图 1.1.1 所示。1.2 粒子群算法求解1.2.1 求解思路 粒子群优化算法(PSO),粒子群中的每一个粒子都代表一个问题的可能解, 通过粒子个体的简单行为,群体内的信息交互实现问题求解的智能性。 在路径规划中,我们将每一条路径规划为一个粒子,每个粒子群群有 n 个粒 子,即有 n 条路径,同时,每个粒子又有 m 个染色体,即中间过渡点的_粒子群算法路径规划
量化评价:稳健的业绩评价指标_rar 海龟-程序员宅基地
文章浏览阅读353次。所谓稳健的评估指标,是指在评估的过程中数据的轻微变化并不会显著的影响一个统计指标。而不稳健的评估指标则相反,在对交易系统进行回测时,参数值的轻微变化会带来不稳健指标的大幅变化。对于不稳健的评估指标,任何对数据有影响的因素都会对测试结果产生过大的影响,这很容易导致数据过拟合。_rar 海龟
IAP在ARM Cortex-M3微控制器实现原理_value line devices connectivity line devices-程序员宅基地
文章浏览阅读607次,点赞2次,收藏7次。–基于STM32F103ZET6的UART通讯实现一、什么是IAP,为什么要IAPIAP即为In Application Programming(在应用中编程),一般情况下,以STM32F10x系列芯片为主控制器的设备在出厂时就已经使用J-Link仿真器将应用代码烧录了,如果在设备使用过程中需要进行应用代码的更换、升级等操作的话,则可能需要将设备返回原厂并拆解出来再使用J-Link重新烧录代码,这就增加了很多不必要的麻烦。站在用户的角度来说,就是能让用户自己来更换设备里边的代码程序而厂家这边只需要提供给_value line devices connectivity line devices