arm-linux---SNMP简单网络管理协议的交叉编译_snmp configure 编译-程序员宅基地
目录
4.3.1 iptables 防火墙对外开放udp:161端口访问权限
4.3.2 确保udp:161端口不被占用(161是snmp默认端口,一般情况下不会被其他占用)
4.3.3 mibs文件路径可以不用指定,运行也没有问题,但是snmpd.conf配置文件路径必需要指定。
1. 平台信息
Linux:VMware Workstation 12 Pro + Ubuntu 12.04 64bit
ARM:ZLG EPC-M6G2C 工控主板
涉及工具:SecureCRT(串口终端)、SugarNMSTool 智和网管软件
交叉工具链:arm-linux-gnueabihf-gcc (gcc-linaro-arm-linux-gnueabihf-4.9-2014.09_linux)
SNMP源码版本:net-snmp-5.7.3
2. SNMP协议
SNMP是简单的网络管理协议,它不是一个软件,而是用于网络管理的一套规则。利用SNMP,一个管理工作站可以远程管理所有支持这种协议的网络设备,包括监视网络状态、修改网络设备配置、接收网络事件警告等。
但话又说回来,为什么要使用SNMP协议?
因为网络设备可能来自不同的厂商,如果每个厂商提供一套独立的管理接口,将使网络管理变得越来越复杂,若想对网络中来自不同厂商的设备监控,用基于SNMP开发的软件进行管理最方便的,因为大部分的设备都支持SNMP协议。
更多:
https://blog.csdn.net/bbwangj/article/details/80981098
https://blog.csdn.net/shmily_cml0603/article/details/12968157
3. 移植和交叉编译SNMP
3.1 下载源码
官网下载地址:http://www.net-snmp.org/download.html
本次下载的是5.7.3版本:https://sourceforge.net/projects/net-snmp/files/net-snmp/5.7.3/
选择下载压缩包:net-snmp-5.7.3.tar.gz
在指定目录下,解压缩源码包:
root@Linux-host:~/hu/SNMP# tar -xzvf net-snmp-5.7.3.tar.gz3.2 配置configure,生成.config文件
snmp的configure配置,可以使用./configure --help查看一下配置选项,具体如下表所示:
| 选项 | 说明 |
|---|---|
| –host=arm-linux | 运行平台 |
| –target=arm-linux | 目标平台 |
| –build=i686-linux | 编译平台 |
| –with-cc=arm-linux-gcc | 交叉编译工具 |
| –with-ar=arm-linux-ar | 使用的打包工具 |
| –prefix=/usr/local/net-snmp | 安装目录 |
| –disable-shared | 不编译共享库 |
| –disable-scripts | 不要安装mib2c等脚本 |
| –with-endianness=little | 指定小端模式 |
| -enable-mini-agent | 最小化构建agent |
| --disable-deprecated | 不编译弃用的功能 |
| --without-logfile | 指定snmpd不输出日志文件(可以使用--with-logfile指定默认日志文件位置) |
| --disable-minimalist | 删除所有非基本的代码功能 |
| –enable-debugging | 打开调试信息 |
| --disable-testing-code | 不使用测试代码(某些代码不被使用) |
| –with-openssl=/opt/hardhat | openssl库路径(用于支持加密等) |
| –disable-ipv6 | 不使用IPv6 |
| –disable-manuals | 不安装manpage说明页 |
| –disable-ucd-snmp-compatibility | 不需要兼容ucd-snmp |
| –disable-snmptrapd-subagent | 不用支持snmptrapd的子代理 |
| –disable-embedded-perl | 在SNMP代理和snmptrapd禁用嵌入式Perl。默认启用 |
| –disable-applications | 是否关闭snmpget等功能,根据自己的需要选择 |
| --with-default-snmp-version="3" | 指定默认协议版本 |
| --enable-as-needed | 仅链接需要库,不链接不必要的库(如果只使用其他方法行不通,链接libperl针对应用而非Net-SNMP库。) |
对于交叉编译,我的配置如下:
root@Linux-host:~/hu/SNMP/net-snmp-5.7.3# ./configure --host=arm-linux \
--build=i686-linux --with-cc=arm-linux-gnueabihf-gcc \
--with-ar=arm-linux-gnueabihf-ar --with-endianness=little \
--disable-ipv6 --disable-embedded-perl --disable-shared  \
--prefix=/root/hu/SNMP/arm-snmp
其中
--with-cc=arm-linux-gnueabihf-gcc需要自己根据情况而定,
--disable-ipv6 取消ipv6的支持
--disable-embedded-perl 不加这一配置,会报错找不到perl库,如下提示:
/usr/bin/ld: cannot find -lperl
collect2: error: ld returned 1 exit status
make[1]: *** [libnetsnmpagent.la] 错误 1
也可以安装相关库:
sudo apt-get install libperl-dev没有出错时,最后提示信息:
...

---------------------------------------------------------
            Net-SNMP configuration summary:
---------------------------------------------------------

  SNMP Versions Supported:    1 2c 3
  Building for:               linux
  Net-SNMP Version:           5.7.3
  Network transport support:  Callback Unix Alias TCP UDP IPv4Base SocketBase TCPBase UDPIPv4Base UDPBase
  SNMPv3 Security Modules:     usm
  Agent MIB code:            default_modules =>  snmpv3mibs mibII ucd_snmp notification notification-log-mib target agent_mibs agentx disman/event disman/schedule utilities host
  MYSQL Trap Logging:         unavailable
  Embedded Perl support:      disabled
  SNMP Perl modules:          disabled
  SNMP Python modules:        disabled
  Crypto support from:        internal
  Authentication support:     MD5 SHA1
  Encryption support:         DES AES
  Local DNSSEC validation:    disabled

---------------------------------------------------------
3.3 编译安装
编译:
root@Linux-host:~/hu/SNMP/net-snmp-5.7.3# make

...
chmod a+x net-snmp-config
touch net-snmp-config-x
用arm-linux-gnueabihf-strip工具可以对生成的snmpd进行瘦身:
root@Linux-host:~/hu/SNMP/net-snmp-5.7.3# ll agent/snmpd
-rwxr-xr-x 1 root root 6528914  7月  2 15:07 agent/snmpd*

root@Linux-host:~/hu/SNMP/net-snmp-5.7.3# arm-linux-gnueabihf-strip agent/snmpd

root@Linux-host:~/hu/SNMP/net-snmp-5.7.3# ll agent/snmpd
-rwxr-xr-x 1 root root 1336548  7月  2 15:08 agent/snmpd*
由上可以看出,snmpd由6M多变为1.3M
安装:
root@Linux-host:~/hu/SNMP/net-snmp-5.7.3# make install之后可以在指定的目录下得到安装后的文件。
root@Linux-host:~/hu/SNMP/net-snmp-5.7.3# cd ../arm-snmp/
root@Linux-host:~/hu/SNMP/arm-snmp# ls
bin  include  lib  sbin  share
3.4 配置文件snmp.conf的修改
先将示例的配置文件拷贝到安装目录下:
root@Linux-host:~/hu/SNMP/net-snmp-5.7.3# cp EXAMPLE.conf ../arm-snmp/share/snmp/snmpd.conf
后进行修改:
root@Linux-host:~/hu/SNMP/arm-snmp# vim share/snmp/snmpd.conf
修改1:打开对外udp:161端口
# Listen for connections from the local system only
#agentAddress udp:127.0.0.1:161 #注释掉
# Listen for connections on all interfaces (both IPv4 *and* IPv6)
#agentAddress udp:161,udp6:[::1]:161
agentAddress udp:161 #添加
修改2:选择SNMP协议版本
#
# ACTIVE MONITORING
#
# send SNMPv1 traps
#trapsink localhost public
# send SNMPv2c traps
trap2sink localhost public
# send SNMPv2c INFORMs
#informsink localhost public
修改3:设置访问权限
#
# ACCESS CONTROL
#
# system + hrSystem groups only
view systemonly included .1.3.6.1.2.1.1
view systemonly included .1.3.6.1.2.1.25.1
# Full access from the local host
#rocommunity public localhost
# Default access to basic system info
# rocommunity public default -V systemonly
rocommunity public default
4. 移植到目标板
将make install生成目录下的sbin/snmpd 以及 share/snmp/mibs/ + snmpd.conf(修改过的),打包为arm-net-snmp-5.7.3.tar,拷贝到SD卡中,最后拷贝到ARM板上。
4.1指令流程:
[root@EPC-M6G2C opt]# mkdir SNMP/
[root@EPC-M6G2C opt]# cd SNMP/
[root@EPC-M6G2C SNMP]# cp /media/mmcblk0p1/arm-net-snmp-5.7.3.tar ./
[root@EPC-M6G2C SNMP]# tar -xvf arm-net-snmp-5.7.3.tar

[root@EPC-M6G2C SNMP]# ls
arm-net-snmp-5.7.3/     arm-net-snmp-5.7.3.tar* readme.txt*
[root@EPC-M6G2C SNMP]# cd arm-net-snmp-5.7.3/
[root@EPC-M6G2C arm-net-snmp-5.7.3]# wr cp sbin/snmpd /usr/sbin/
[root@EPC-M6G2C arm-net-snmp-5.7.3]# wr cp -r share/ /usr/local/
[root@EPC-M6G2C arm-net-snmp-5.7.3]# ll /usr/sbin/snmpd
-rwxr-xr-x    1 root     root        1.3M Jul  2 07:36 /usr/sbin/snmpd*
[root@EPC-M6G2C arm-net-snmp-5.7.3]# ll /usr/local/share/snmp/
total 8
drwxr-xr-x    3 root     root         296 Jul  2 07:36 ./
drwxr-xr-x    3 root     root         224 Jul  2 07:36 ../
drwxr-xr-x    2 root     root        5.1K Jul  2 07:36 mibs/
-rw-r--r--    1 root     root        6.9K Jul  2 07:36 snmpd.conf
4.2 运行snmpd
snmpd命令选项:
注:snmpd命令的有用选项
-c FILE 指定文件为配置文件
-C 不读取默认的配置文件
-d dump接收和发送SNMP数据包
-D TOKEN 对于给定的TOKEN(标志)打开调试信息 ( -Dmib_init)
-I [-]INITLIST 对于要初始化的MIB列表显示
-M DIRLIST 指定MIB库的路径
-V 显示详细信息
-Le 把错误信息输出到日志中
-Lf FILE 把错误信息输出到指定文件中
-m MIBLIST use MIBLIST instead of the default MIB list
-f                    do not fork from the shell
依次可执行:
[root@EPC-M6G2C arm-net-snmp-5.7.3]# snmpd -c /usr/local/share/snmp/snmpd.conf -
f -Le -d -M /usr/local/share/snmp/mibs/
Turning on AgentX master support.
Failed to create the persistent directory for /var/net-snmp/snmpd.conf
read_config_store open failure on /var/net-snmp/snmpd.conf
Failed to create the persistent directory for /var/net-snmp/snmpd.conf
read_config_store open failure on /var/net-snmp/snmpd.conf
Failed to create the persistent directory for /var/net-snmp/snmpd.conf
read_config_store open failure on /var/net-snmp/snmpd.conf
Failed to create the persistent directory for /var/net-snmp/snmpd.conf
read_config_store open failure on /var/net-snmp/snmpd.conf
Failed to create the persistent directory for /var/net-snmp/snmpd.conf
read_config_store open failure on /var/net-snmp/snmpd.conf
Failed to create the persistent directory for /var/net-snmp/snmpd.conf
read_config_store open failure on /var/net-snmp/snmpd.conf
Failed to create the persistent directory for /var/net-snmp/snmpd.conf
read_config_store open failure on /var/net-snmp/snmpd.conf
Failed to create the persistent directory for /var/net-snmp/snmpd.conf
read_config_store open failure on /var/net-snmp/snmpd.conf
Failed to create the persistent directory for /var/net-snmp/snmpd.conf
read_config_store open failure on /var/net-snmp/snmpd.conf
Failed to create the persistent directory for /var/net-snmp/snmpd.conf
read_config_store open failure on /var/net-snmp/snmpd.conf
Failed to create the persistent directory for /var/net-snmp/snmpd.conf
read_config_store open failure on /var/net-snmp/snmpd.conf
Failed to create the persistent directory for /var/net-snmp/snmpd.conf
read_config_store open failure on /var/net-snmp/snmpd.conf
Failed to create the persistent directory for /var/net-snmp/snmpd.conf
read_config_store open failure on /var/net-snmp/snmpd.conf
Failed to create the persistent directory for /var/net-snmp/snmpd.conf
read_config_store open failure on /var/net-snmp/snmpd.conf
Failed to create the persistent directory for /var/net-snmp/snmpd.conf
read_config_store open failure on /var/net-snmp/snmpd.conf
Failed to create the persistent directory for /var/net-snmp/snmpd.conf
read_config_store open failure on /var/net-snmp/snmpd.conf

Sending 44 bytes to UDP: [127.0.0.1]:162->[0.0.0.0]:0
0000: 30 2A 02 01  00 04 06 70  75 62 6C 69  63 A4 1D 06    0*.....public...
0016: 0A 2B 06 01  04 01 BF 08  03 02 0A 40  04 C0 A8 0A    .+.........@....
0032: 74 02 01 00  02 01 00 43  01 62 30 00                 t......C.b0.

NET-SNMP version 5.7.3

Sending 1 bytes to callback: 2 on fd 5
0000: 00                                                    .


Received 1 byte packet from callback: 1 on fd 3
0000: 00                                                    .


Sending 1 bytes to callback: 1 on fd 3
0000: 00                                                    .


Received 1 byte packet from callback: 2 on fd 5
0000: 00                                                    .


Sending 1 bytes to callback: 2 on fd 5
0000: 00                                                    .


Received 1 byte packet from callback: 1 on fd 3
0000: 00                                                    .


Sending 1 bytes to callback: 1 on fd 3
0000: 00                                                    .
可以看出运行正常,有发送和接受的udp数据包。
4.3 注意事项
4.3.1 iptables 防火墙对外开放udp:161端口访问权限
iptables -I INPUT -p udp --dport 161 -j ACCEPT可用命令查看当前情况:
iptables -L
4.3.2 确保udp:161端口不被占用(161是snmp默认端口,一般情况下不会被其他占用)
可用命令查看端口情况:
netstat -an |grep 161
4.3.3 mibs文件路径可以不用指定,运行也没有问题,但是snmpd.conf配置文件路径必需要指定。
5. snmp测试
明天再写,先下班。
5.1 SNMP 的网络架构
SNMP网络架构由三部分组成:NMS(网络管理站)、Agent(代理)、MIB(管理信息库)
5.1.1 NMS(网络管理站)
NMS是网络中的管理者,是一个利用SNMP协议对网络设备进行管理和监视的系统。可以是一台专门用来进行网络管理的服务器,也可以指某个设备中之中管理功能的一个应用程序。
NMS可以向Agent发出请求,查询或修改一个或多个具体的参数值。同时,NMS可以接收Agent主动发送的Trap信息,以获知被管理设备当前的状态
5.1.2 Agent 代理
Agent是网络设备中的一个应用模块,用于维护被管理设备的信息数据,并响应NMS的请求,把管理数据汇报给发送请求的NMS。
Agent接收到NMS的请求信息后,完成查询或修改操作,并把操作结果发送给NMS,完成响应。同时,当设备发生故障或者其他事件的时候,Agent会主动发送Trap信息给NMS,通知设备当前的状态变化。
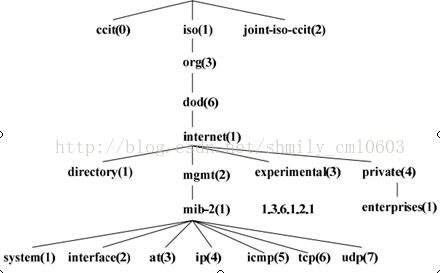
5.1.3 MIB 管理信息库
任何一个被管理的资源都表示成一个对象,称为被管理的对象。MIB就是被管理对象的集合。它定义了被管理对象的一系列的属性:对象的名称、对象的访问权限和对象的数据类型等。每个Agent都有自己的MIB。MIB也可以看做是NMS和Agent之间的一个接口,通过这个接口,NMS可以对Agent中的每一个被管理对象进行读/写操作,从而达到管理和监控设备的目的
NMS、Agent 和 MIB 之间的关系如图所示:

MIB的结构:
MIB是以树状结构进行存储的,树的节点表示被管理对象,它可以用从根开始的一条路径唯一地识别,这条路径就称为OID。
如图所示,管理对象system可以用一串数字{1.3.6.1.2.1.1}唯一标识,这串数字就是system的OID。
5.2 SNMP 的测试
首先,在板端运行snmpd 服务进程,详见4.2;
然后用网线将板端的网口与windows相连,必要时手动修改Windows IP,确保板端与Windows处于同一网域;
最后在windows平台下运行SugarNMSTool 网络管理工具,运行效果如下。

如上图所示
IP : 192.168.10.116 是ARM的地址,搜索设备时,可以按这一网段进行搜索。
SNMP5.7.3的源码包 以及 SugarNMSTool 工具的下载链接(其中包含使用说明):
https://download.csdn.net/download/sunny_hu92/12572162
以上就是这两天时间来,完成的SNMP在Linux下交叉编译和移植到ARM板,以及利用NMS工具测试的全部流程,期间也遇到很多坑,关键点在于./configure的配置参数,大家一定要注意。以此博文记录,以备后查。
20200703
智能推荐
解决electron+vue项目起始加载慢的问题_electron vue项目打开慢-程序员宅基地
文章浏览阅读461次。_electron vue项目打开慢
linux下编译GDAL外加扩展格式支持(五)--完-程序员宅基地
文章浏览阅读229次。接1、2、3、4篇。10、安装mysql支持安装fedora15或者16系统时若选择安装mysql数据库,则必须自行安装mysql开发包。因为自带默认数据库不会安装这个包。否则会遇到mysql错误:ogr_mysql.h:34:23: fatal error: my_global.h: No such file or directory#问题原因:找不到mysql头文件..._linux gdal netcdf5
Linux tc qdisc 模拟网络丢包延时-程序员宅基地
文章浏览阅读1.2k次。Linux tc qdisc 模拟网络丢包延时_tc qdisc
linux64bit 安装 jdk 1.7-程序员宅基地
文章浏览阅读336次。linux64bit 安装 jdk 1.7下载地址 : https://edelivery.oracle.com/otn-pub/java/jdk/7u21-b11/jdk-7u21-linux-x64.rpm0. 卸载rpm版的jdk: #rpm -qa|grep jdk 显示:jdk-1.6.0_10-fcs 卸载:#rpm -e --nodep..._liunx64位得jdk1.7
【Linux笔记】-----Nginx/LVS/HAProxy负载均衡的优缺点_中间件应用场景nginx lvs proxy-程序员宅基地
文章浏览阅读552次。开始听到负载均衡的时候,我第一反应想到的是链路负载均衡,在此之前主要是在学习网络方面知识,像在NA、NP阶段实验做链路负载均衡时常会遇到,后来还接触到SLB负载分担技术,这都是在链路基础上实现的。 其实负载均衡可以分为硬件实现负载均衡和软件实现负载均衡。 硬件实现负载均衡:常见F5和Array负载均衡器,配套专业维护服务,但是成本昂贵。 软件实现负载均衡:常见开源免费的负载均衡软件有Ngin..._中间件应用场景nginx lvs proxy
多维时序 | MATLAB实现CNN-LSTM多变量时序预测_cnn可以进行多步预测-程序员宅基地
文章浏览阅读4.7k次。多维时序 | MATLAB实现CNN-LSTM多变量时序预测目录多维时序 | MATLAB实现CNN-LSTM多变量多步预测基本介绍模型特点程序设计学习总结参考资料基本介绍本次运行测试环境MATLAB2020b,MATLAB实现CNN-LSTM多变量多步预测。模型特点深度学习使用分布式的分层特征表示方法自动提取数据中的从最低层到最高层固有的抽象特征和隐藏不变结构. 为了充分利用单个模型的优点并提高预测性能, 现已提出了许多组合模型。CNN 是多层前馈神经网络, 已被证明在提取隐藏_cnn可以进行多步预测
随便推点
【9.3】用户和组的管理、密码_polkitd:input 用户和组-程序员宅基地
文章浏览阅读219次。3.1 用户配置文件和密码配置文件3.2 用户组管理3.3 用户管理3.4 usermod命令3.5 用户密码管理3.6 mkpasswd命令_polkitd:input 用户和组
pca算法python代码_三种方法实现PCA算法(Python)-程序员宅基地
文章浏览阅读670次。主成分分析,即Principal Component Analysis(PCA),是多元统计中的重要内容,也广泛应用于机器学习和其它领域。它的主要作用是对高维数据进行降维。PCA把原先的n个特征用数目更少的k个特征取代,新特征是旧特征的线性组合,这些线性组合最大化样本方差,尽量使新的k个特征互不相关。关于PCA的更多介绍,请参考:https://en.wikipedia.org/wiki/Prin..._inprementation python code of pca
内存地址Linux下内存分配与映射之一-程序员宅基地
文章浏览阅读35次。发一下牢骚和主题无关:地址类型:32位的cpu,共4G间空,其中0-3G属于用户间空地址,3G-4G是内核间空地址。用户虚拟地址:用户间空程序的地址物理地址:cpu与内存之间的用使地址总线地址:外围总线和内存之间的用使地址内核逻辑地址:内存的分部或全体射映,大多数情况下,它与物理地址仅差一个偏移量。如Kmalloc分..._linux 内存条与内存地址
自动化测试介绍_自动化测试中baw库指的什么-程序员宅基地
文章浏览阅读1.3k次,点赞2次,收藏16次。什么是自动化测试? 做测试好几年了,真正学习和实践自动化测试一年,自我感觉这一个年中收获许多。一直想动笔写一篇文章分享自动化测试实践中的一些经验。终于决定花点时间来做这件事儿。 首先理清自动化测试的概念,广义上来讲,自动化包括一切通过工具(程序)的方式来代替或辅助手工测试的行为都可以看做自动化,包括性能测试工具(loadrunner、jmeter),或自己所写的一段程序,用于_自动化测试中baw库指的什么
a0图框标题栏尺寸_a0图纸尺寸(a0图纸标题栏尺寸标准国标)-程序员宅基地
文章浏览阅读1.6w次。A0纸指的是一平方米大小的白银比例长方形纸(长为1189mm宽为841mm)。A0=1189mm*841mm A1=841mm*594mm 相当于1/2张A0纸 A2=594mm*420mm 相当于1/4.A1图纸大小尺寸:841mm*594mm 即长为841mm,宽为594mm 过去是以多少"开"(例如8开或16开等)来表示纸张的大小,我国采用国际标准,规定以 A0、A1、A2、.GB/T 14..._a0图纸尺寸
TreeTable的简单实现_treetable canvas-程序员宅基地
文章浏览阅读966次。最终效果图:UI说明:针对table本身进行增强的tree table组件。 tree的数据来源是单元格内a元素的自定义属性:level和type。具体代码如下:Java代码 DepartmentEmployeeIDposi_treetable canvas