Android的前后端交互框架搭建(okhhtp+springboot+mysql完整版)_安卓后端用什么框架-程序员宅基地
技术标签: 笔记 java android http mysql 移动应用开发 springboot
前言
经过打工人的不懈努力,终于敲出了多层封装的安卓前后端分离项目的雏形。
前期准备
开发环境:
(1)jdk1.8
(2)Android stdio 4.1 (包含自带的Gradle)
(3)IntelliJ IDEA 2020.2.3 x64 (包含配置好的的Maven)
项目框架及依赖
安卓用了OKHttp
后端用了springboot+mybatis-plus
安卓前端的gradle依赖
dependencies {

    implementation 'androidx.appcompat:appcompat:1.2.0'
    implementation 'com.google.android.material:material:1.3.0'
    implementation 'androidx.constraintlayout:constraintlayout:2.0.4'
    implementation 'com.squareup.okhttp3:okhttp:4.2.2'
    implementation 'com.google.code.gson:gson:2.7'
    testImplementation 'junit:junit:4.+'
    androidTestImplementation 'androidx.test.ext:junit:1.1.2'
    androidTestImplementation 'androidx.test.espresso:espresso-core:3.3.0'
}
springboot项目的maven依赖
    <dependencies>
        <dependency>
            <groupId>org.springframework.boot</groupId>
            <artifactId>spring-boot-starter-web</artifactId>
        </dependency>

        <dependency>
            <groupId>mysql</groupId>
            <artifactId>mysql-connector-java</artifactId>
            <scope>runtime</scope>
        </dependency>
        <dependency>
            <groupId>org.projectlombok</groupId>
            <artifactId>lombok</artifactId>
            <optional>true</optional>
        </dependency>
        <dependency>
            <groupId>org.springframework.boot</groupId>
            <artifactId>spring-boot-starter-test</artifactId>
            <scope>test</scope>
        </dependency>

        <dependency>
            <groupId>com.baomidou</groupId>
            <artifactId>mybatis-plus-boot-starter</artifactId>
            <version>3.4.2</version>
        </dependency>

        <dependency>
            <groupId>com.baomidou</groupId>
            <artifactId>mybatis-plus-generator</artifactId>
            <version>3.3.2</version>
        </dependency>

        <dependency>
            <groupId>org.apache.velocity</groupId>
            <artifactId>velocity</artifactId>
            <version>1.7</version>
        </dependency>
        <dependency>
            <groupId>com.google.code.gson</groupId>
            <artifactId>gson</artifactId>
        </dependency>


    </dependencies>
后端搭建
1.通过mybatis-plus模板生成
根据数据库中的表user创建

生成mvc代码:Generate.java(要放在包的最外层,与初始的springboot启动类平级的位置,例如:放在com.example下)
import com.baomidou.mybatisplus.annotation.DbType;
import com.baomidou.mybatisplus.generator.AutoGenerator;
import com.baomidou.mybatisplus.generator.config.DataSourceConfig;
import com.baomidou.mybatisplus.generator.config.GlobalConfig;
import com.baomidou.mybatisplus.generator.config.PackageConfig;
import com.baomidou.mybatisplus.generator.config.StrategyConfig;
import com.baomidou.mybatisplus.generator.config.rules.NamingStrategy;

import java.util.ArrayList;
import java.util.List;

public class Generate {


    public static void main(String[] args) {


        //创建generator对象
        AutoGenerator autoGenerator = new AutoGenerator();
        //数据源
        DataSourceConfig dataSourceConfig = new DataSourceConfig();
        dataSourceConfig.setDbType(DbType.MYSQL);
        dataSourceConfig.setDriverName("com.mysql.cj.jdbc.Driver");
        dataSourceConfig.setUsername("root");
        dataSourceConfig.setPassword("123456");
        dataSourceConfig.setUrl("jdbc:mysql://localhost:3306/dbName");
        autoGenerator.setDataSource(dataSourceConfig);
        //全局配置
        GlobalConfig globalConfig = new GlobalConfig();
        globalConfig.setOutputDir(System.getProperty("user.dir")+"/src/main/java");
        globalConfig.setAuthor("admin");
        globalConfig.setOpen(false);
        globalConfig.setServiceName("%sService");
        autoGenerator.setGlobalConfig(globalConfig);
        //包信息
        PackageConfig packageConfig = new PackageConfig();
        packageConfig.setParent("com.example");//包名
        packageConfig.setEntity("entity");
        packageConfig.setMapper("mapper");
        packageConfig.setService("service");
        packageConfig.setServiceImpl("service.impl");
        packageConfig.setController("controller");
        autoGenerator.setPackageInfo(packageConfig);
        //策略配置
        StrategyConfig strategyConfig = new StrategyConfig();
        String tablesName="user";
        strategyConfig.setInclude(tablesName);

        strategyConfig.setNaming(NamingStrategy.underline_to_camel);
        strategyConfig.setColumnNaming(NamingStrategy.underline_to_camel);
        strategyConfig.setEntityLombokModel(true);
        autoGenerator.setStrategy(strategyConfig);
        //运行
        autoGenerator.execute();
    }
}
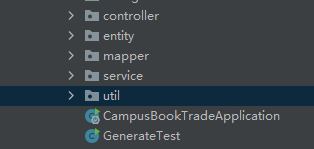
生成结果:(没有util)
创建一个结果类Result,用来装结果集(第三个参数装json字符串)
import lombok.Data;
import lombok.EqualsAndHashCode;

@Data
@EqualsAndHashCode(callSuper = false)
public class Result {


	private int code;
	private String msg;
	private String result;
	public void setSuccess(String msg, String result){


		this.code=200;
		this.msg="success-"+msg;
		this.result=result;
	}
	public void setInfo(String msg, String result){


		this.code=400;
		this.msg="warning-"+msg;
		this.result=result;
	}
}
配置文件application改成yml后缀
application.yml内容为:
spring:
  datasource:
    url: jdbc:mysql://localhost:3306/db_name
    username: root
    password: 123456
    driver-class-name: com.mysql.cj.jdbc.Driver
mybatis-plus:
  configuration:
    log-impl: org.apache.ibatis.logging.stdout.StdOutImpl
  mapper-locations: classpath:com/example/mapper/xml/*.xml
server:
  port: 8081
控制层:
import com.campus.book.entity.Result;
import com.campus.book.entity.User;
import com.campus.book.service.UserService;
import com.campus.book.util.JsonBean;
import com.google.gson.Gson;
import org.springframework.beans.factory.annotation.Autowired;
import org.springframework.web.bind.annotation.*;


import java.io.Serializable;

@RestController
@RequestMapping("//user")
public class UserController {


	@Autowired
	private UserService userService;

	Gson gson= new GsonBuilder().serializeNulls().create();
	Result result=new Result();

	@PostMapping("/insert")
	public Result insert(String json){


		User user=null;
		try{


			user=gson.fromJson(json,User.class);
		}catch (Exception e){


			e.printStackTrace();
		}
		if(userService.getById(user.getId())!=null){

    //id重复!
			result.setInfo("该账号已注册!",null);
		}else{


			userService.save(user);
			result.setSuccess("注册成功!",gson.toJson(user));
		}
		return result;
	}

	@DeleteMapping("/delete/{id}")
	public Result delete(@PathVariable("id") Serializable id) {


		result.setSuccess("删除成功!", null);
		boolean is=this.userService.removeById(id);
		if(is){


		}else{


			result.setInfo("删除失败!",null);
		}
		return result;
	}

	@PutMapping("/update")
	public Result update(String json) {


		result.setInfo("更改失败!",json);
		User user=null;
		try{


			user=gson.fromJson(json,User.class);
			if(this.userService.updateById(user)){


				result.setSuccess("更改成功!",gson.toJson(userService.getById(user.getId())));
			}
		}catch (Exception e){


			e.printStackTrace();
		}
		return result;
	}

	@GetMapping("/list")
	public Result list() {


		result.setSuccess("查询成功!", gson.toJson(this.userService.list()));
		return result;
	}

	@GetMapping("/line/{id}")
	public Result getUser(@PathVariable("id") Serializable id){


		User user=userService.getById(id);
		if(user!=null){

    //存在
			result.setSuccess("查询成功!",gson.toJson(user));
		}else{

    //不存在
			result.setSuccess("没有找到相关数据!",null);
		}
		return result;
智能推荐
while循环&CPU占用率高问题深入分析与解决方案_main函数使用while(1)循环cpu占用99-程序员宅基地
文章浏览阅读3.8k次,点赞9次,收藏28次。直接上一个工作中碰到的问题,另外一个系统开启多线程调用我这边的接口,然后我这边会开启多线程批量查询第三方接口并且返回给调用方。使用的是两三年前别人遗留下来的方法,放到线上后发现确实是可以正常取到结果,但是一旦调用,CPU占用就直接100%(部署环境是win server服务器)。因此查看了下相关的老代码并使用JProfiler查看发现是在某个while循环的时候有问题。具体项目代码就不贴了,类似于下面这段代码。while(flag) {//your code;}这里的flag._main函数使用while(1)循环cpu占用99
【无标题】jetbrains idea shift f6不生效_idea shift +f6快捷键不生效-程序员宅基地
文章浏览阅读347次。idea shift f6 快捷键无效_idea shift +f6快捷键不生效
node.js学习笔记之Node中的核心模块_node模块中有很多核心模块,以下不属于核心模块,使用时需下载的是-程序员宅基地
文章浏览阅读135次。Ecmacript 中没有DOM 和 BOM核心模块Node为JavaScript提供了很多服务器级别,这些API绝大多数都被包装到了一个具名和核心模块中了,例如文件操作的 fs 核心模块 ,http服务构建的http 模块 path 路径操作模块 os 操作系统信息模块// 用来获取机器信息的var os = require('os')// 用来操作路径的var path = require('path')// 获取当前机器的 CPU 信息console.log(os.cpus._node模块中有很多核心模块,以下不属于核心模块,使用时需下载的是
数学建模【SPSS 下载-安装、方差分析与回归分析的SPSS实现(软件概述、方差分析、回归分析)】_化工数学模型数据回归软件-程序员宅基地
文章浏览阅读10w+次,点赞435次,收藏3.4k次。SPSS 22 下载安装过程7.6 方差分析与回归分析的SPSS实现7.6.1 SPSS软件概述1 SPSS版本与安装2 SPSS界面3 SPSS特点4 SPSS数据7.6.2 SPSS与方差分析1 单因素方差分析2 双因素方差分析7.6.3 SPSS与回归分析SPSS回归分析过程牙膏价格问题的回归分析_化工数学模型数据回归软件
利用hutool实现邮件发送功能_hutool发送邮件-程序员宅基地
文章浏览阅读7.5k次。如何利用hutool工具包实现邮件发送功能呢?1、首先引入hutool依赖<dependency> <groupId>cn.hutool</groupId> <artifactId>hutool-all</artifactId> <version>5.7.19</version></dependency>2、编写邮件发送工具类package com.pc.c..._hutool发送邮件
docker安装elasticsearch,elasticsearch-head,kibana,ik分词器_docker安装kibana连接elasticsearch并且elasticsearch有密码-程序员宅基地
文章浏览阅读867次,点赞2次,收藏2次。docker安装elasticsearch,elasticsearch-head,kibana,ik分词器安装方式基本有两种,一种是pull的方式,一种是Dockerfile的方式,由于pull的方式pull下来后还需配置许多东西且不便于复用,个人比较喜欢使用Dockerfile的方式所有docker支持的镜像基本都在https://hub.docker.com/docker的官网上能找到合..._docker安装kibana连接elasticsearch并且elasticsearch有密码
随便推点
Python 攻克移动开发失败!_beeware-程序员宅基地
文章浏览阅读1.3w次,点赞57次,收藏92次。整理 | 郑丽媛出品 | CSDN(ID:CSDNnews)近年来,随着机器学习的兴起,有一门编程语言逐渐变得火热——Python。得益于其针对机器学习提供了大量开源框架和第三方模块,内置..._beeware
Swift4.0_Timer 的基本使用_swift timer 暂停-程序员宅基地
文章浏览阅读7.9k次。//// ViewController.swift// Day_10_Timer//// Created by dongqiangfei on 2018/10/15.// Copyright 2018年 飞飞. All rights reserved.//import UIKitclass ViewController: UIViewController { ..._swift timer 暂停
元素三大等待-程序员宅基地
文章浏览阅读986次,点赞2次,收藏2次。1.硬性等待让当前线程暂停执行,应用场景:代码执行速度太快了,但是UI元素没有立马加载出来,造成两者不同步,这时候就可以让代码等待一下,再去执行找元素的动作线程休眠,强制等待 Thread.sleep(long mills)package com.example.demo;import org.junit.jupiter.api.Test;import org.openqa.selenium.By;import org.openqa.selenium.firefox.Firefox.._元素三大等待
Java软件工程师职位分析_java岗位分析-程序员宅基地
文章浏览阅读3k次,点赞4次,收藏14次。Java软件工程师职位分析_java岗位分析
Java:Unreachable code的解决方法_java unreachable code-程序员宅基地
文章浏览阅读2k次。Java:Unreachable code的解决方法_java unreachable code
标签data-*自定义属性值和根据data属性值查找对应标签_如何根据data-*属性获取对应的标签对象-程序员宅基地
文章浏览阅读1w次。1、html中设置标签data-*的值 标题 11111 222222、点击获取当前标签的data-url的值$('dd').on('click', function() { var urlVal = $(this).data('ur_如何根据data-*属性获取对应的标签对象